


File storage is a big problem faced by many people. Everyone is out of storage. The size of the files increases day by day. So, They began to create cloud server to keep their files safe. DropBox, Google Drive, and iCloud were such Cloud storage giants. The Users had a strong belief in the security of these Warehouses. But, the hackers are intelligent enough to break any Security systems in the world. They are such a bunch of brilliant, mighty People. They hacked all of these warehouses and stole the data or completely destroyed them. The users had lost the belief in These cloud storage giants also.
Now a question emerges. Where to Store the data Securely? Where can we manage our important files without worrying about those creepy hackers? And they searched Google for “How To Create Cloud Server”. The answer is very simple. You can make your own private cloud storage in a couple of minutes. Before I telling that. How would it be, If you have Your Own Private cloud-based server Where you have the full control and you will be the supreme authority to manage and edit all the features on Your cloud? It would be great.
OwnCloud is such a great cloud platform which uses a cloud software that let you manage the cloud storage as you controlling the files on your own Hard drive. It is a popular open source program that offers a very simple way to set up a personal private cloud such as Dropbox or iCloud. The OwnCloud has the caliber to beat any other Cloud Giants. It has its own app support, you have text editors for rich text editing, Calenders, photo galleries, Built-in Music player and much more. To create cloud server for the private and personal purpose, OwnCloud is your ultimate choice.
The Requirements to Create Cloud Server using OwnCloud
These are the basic requirements to have an OwnCloud storage:
- Your web host must support PHP5 and MySQL or SQLite
- ownCloud Server 5
- A domain name
How to Setup OwnCloud Storage – A Complete Guide
It is very easy to install ownCloud storage. You don’t need any special skills or advanced knowledge to do it. Our Simple and definitive Guide on “How To Create Own and Private Cloud Storage Using OwnCloud” will guide you till the end. It is recommended to use the web installer for the Setup because it is very easy to setup the OwnCloud using the web installer and the installer itself guide you through all the steps.
Note: Manually create a database if you need Multiple User access to the OwnCloud Private storage.
- First of all, Download The web installer from here.
- Then, Upload the setup-owncloud.php file to your web space using your hosting providers web interface or Using an FTP program like Filezilla.
- Enter the URL of the setup file that you download, into your web browser. It should something like this “
http://www.domainname.com/setup-owncloud.php.” (‘domain name’ will be the domain name of your website) - Simply follow the instructions to install OwnCloud.
- It will automatically redirect you to the login page when the setup is completed.
You are done. It is very simple as I mentioned before. If your server or host doesn’t meet the requirements mentioned before, You can manually install it. For this check this guide “ownCloud’s guide for manual installations”. This might be helpful to you. If you did that correctly, You will get a private OwnCloud storage within minutes.
Set Up Your Desktop and Mobile Sync

Now, OwnCloud is installed on your web server and we want to set up the desktop sync. For this, you’ll need to install the desktop client.
Follow the steps below carefully to setup the desktop sync:
- Start OwnCloud software and select “configure“
- Insert the URL of your OwnCloud server and the login credentials on appropriate boxes.
- To select the files and folders to sync. Click on the “Add folder…” Button and select the folder where you want to sync the files from.
- The Files in this folder will automatically sync to the OwnCloud Storage.
Note: You can add as many folders that you want to sync files from.
You can also use the mobile apps of the OwnCloud to access the cloud on the go Get the OwnCloud app for (Android/iPhone) and manage your Files on the go.
How to sync Calendar, Address Book, and Music
This is an optional part of the setup. All the basic parts are completed already. If you are very concern of your Addresses, Calendar, and Music. Don’t worry about them anymore. Just follow the steps below to make all your important stuff Locked.
How to Sync the Calendars
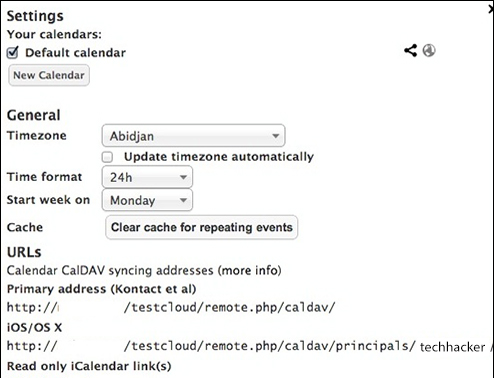
If you have your own Calendar app that supports CalDAV, The process is very simple, You just need to point it to your ownCloud Storage. To do this:
- Click the Calendar icon on the right side of the window.
- Then, Click the gear icon in the top right of the Popup window.
- Now, Copy the URL for your calendar.
Almost done, Just go to the settings of the Calendar app, and add your account in the CalDAV section of the app. Now all the calendars are safe.
How to sync the Contacts
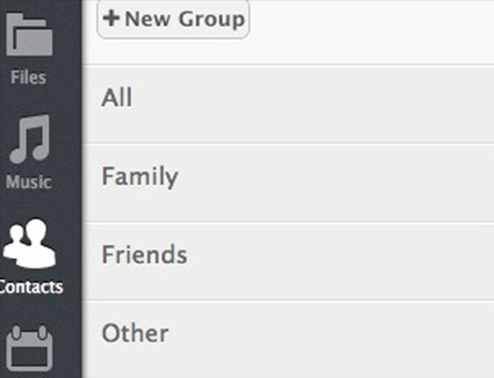
The Process is very similar to that of the previous one:
- First, Export the contacts from the address book into a VCF file.
- In OwnCloud window, select the “Contacts” and click the gear icon on the bottom left the corner.
- Then, Click on “Import” and select the VCF file you want to upload.
Be patient till the process is completed. It might take some time if you have a large number of contacts to upload. Once the upload process is complete. You can sync your contacts anytime.
How to set up a Music Server


If you are a music craze. You will definitely love this OwnCloud storage. It allows you to upload All your music files into the Private cloud and access them with the built-in music Player on the OwnCloud. You can also setup a desktop client to get access to your favorite music files anytime anywhere.
Tomahawk is a Music player app for OwnCloud which is Simple, Elegant and Powerful. To Setup Tomahawk, just follow the steps described below:
- Go to the OwnCloud interface.
- Click on your username and select “Personal.“
- Now, Copy the URL listed as Media (It might be something like:
http://yourdomain/owncloud/remote.php/ampache) - In Tomahawk App, Go to the Tomahawk > Preferences, then select “Services.“
- Select “Ampache.“
- A dialogue box will open up
- Type the ownCloud username and password and the URL you copied above.
You are done. All the Music files in your OwnCloud will be played on the Tomahawk Music player. If you don’t like this player you can always add any of the apps you like from the OwnCloud App Store. Not only the music players, You can find tons of apps on this great store. The apps list contains Journal for syncing and managing files, Roundcube for the mail server and many more.
So, Time to conclude. In short, The OwnCloisd is the complete solution to all of your cloud storage needs. You must consider it if you are really caring of your files. The high-security systems of the OwnCloud make it unbreakable by any hackers. And above all of them, You are the controller of it!