

If you are not aware of the recent developments happening to Gmail, we would like to inform you that it is now possible to schedule emails on Gmail. While this is possible with Gmail’s in-built scheduler, we know that it is better to use third-party apps for the same. Because you get many advantages in addition to what you get with Gmail’s in-built tool. Now, one of the best schedulers for Gmail is Boomerang.
If you have never heard about Boomerang, we recommend you to check it out. Now, we would also like to point out that Boomerang is great if you are a heavy user meaning that you need to schedule plenty of emails on a daily basis. For others who use schedulers once in a while, Gmail’s in-built tool will do the job for you.

Here, we will talk about heavy users and how they can take advantage of Boomerang for Gmail to schedule their emails. So the first thing you need to know is how to schedule emails on Boomerang for Gmail. For that, you need to follow the steps mentioned below.
How to schedule emails in Gmail with Boomerang
- First, you need to download the Boomerang browser extension for Gmail.
- Then, you just have to log in with your Gmail account for Boomerang to get access to your account.
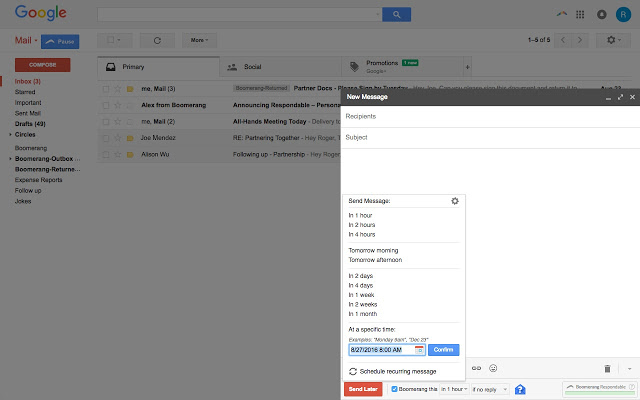
- The next step is to just compose an email as you would normally.
- Now, you will not just see the “Send” button but also the “Send Later” button which means you can schedule your emails.
- You can now select any specific time, date or day to send the mail by selecting the “Send Later” button. Once you have selected the option, click Confirm.
- Once you have your email scheduled, you will see a small banner that will tell you exactly when your email will be sent.

That’s it. Now you are able to set a specific sending time in Gmail with the help of Boomerang, Let us know the valuable feedback in the comment box below.