


If you are planning to buy a VPN service for your Windows-based laptop or PC, then we are already suggested best VPN for Windows 10.
Whatever the reason for using a VPN, it is always advisable to use a VPN service to anyone. In this article, you will know how to setup VPN on Windows. Once the app is installed, it will automatically start with the Windows when it boots up.
What do you need to get started?
To get started, you will need an active subscription of a VPN service. Whether it is a free trial or membership, it needs to be active to use the service. Also, a Windows 10 based laptop or desktop with an active Internet connection.
If you are new to VPN service, you can check our guides published in the past like, What is VPN, VPN advantages etc.
VPN services like ExpressVPN are offering a reliable and faster service to users. Currently, ExpressVPN is offering a 12+3 months offer exclusively for thetechhacker audience.
How to setup VPN on Windows 10 with the dedicated app
You just need a couple of minutes to setup VPN on Windows 10. Most of the VPN services are coming with dedicated apps for Windows and other desktops OS like Mac and Linux.
Once you purchased the VPN service, head over to the official website of the VPN and download the Windows app. In this article, I’m using FatestVPN for VPN installation demonstration. Here is the procedure in detailed steps.
- Install the downloaded VPN app on your Windows 10.
- Follow the on-screen instructions given by the VPN client and also give permissions to access the Internet.
- Once the installation completed, now launch the app from Start Menu.
- Here, sign-in to the VPN service. Use the credentials given by the VPN service provider when you purchase the VPN account. Usually, you will find the VPN account details in the email used while purchasing the account.

- After a successful sign-in, the app shows the list of server locations to connect.
- By default, every VPN service suggests the best server location based on the ping rate to provide a faster experience.
- If you do not want to connect with the automatic server location, you can choose from a list of server locations available on the app user-interface.

How to setup VPN on Windows 10 using OpenVPN Client
Alternatively, you can use OpenVPN client to connect to a VPN service. It takes a few minutes more time than the dedicated VPN app setup. However, OpenVPN is the best client to access VPN service with better security, and firewall compatibility. These are the steps to setup OpenVPN on Windows 10.
- Download and install the OpenVPN client on Windows 10 from here.
- After installation, right-click on the Desktop icon of the OpenVPN and select Properties.
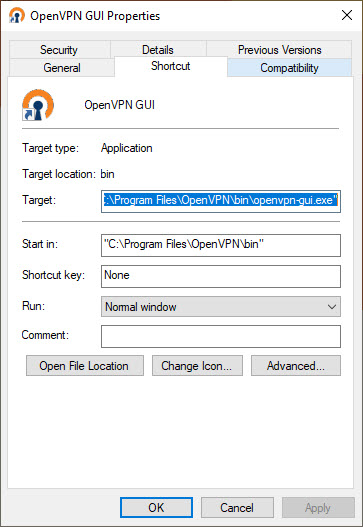
- Here, click on “Advanced“.

- Now sign on “Run as administrator” and then click on “OK”.

- Download the TCP files or UDP files of the VPN service provider and copy them.
- Now go to the installed directory of the Open VPN and follow the path: C:\Program Files\OpenVPN\config and paste the files.

- Next, you can access the open VPN from the system tray on the taskbar and right-click on the icon to select the desired server of your VPN.

- Now login with your VPN service credentials and click on “Save Password” if you want to use in the future.
- When you want to disconnect the VPN service, right-click on the OpenVPN icon in the system tray, go to the connected server and click on “Disconnect“.


Conclusion
That’s it. Now you have successfully connected to a VPN service on the Windows 10. To check the credibility of the VPN service, visit websites like DNSleaktest, WhatismyIPaddress, etc.
Let us know your valuable feedback in the comment section below.