


If you are planning to upgrade your PC or if you want to reinstall the windows on another computer, you might need an extra activation key to activate the windows OS. But, why should you do that when you already own a windows product key? You can uninstall windows product key and can use it on a new computer where you are planning to install the new windows OS. In this article, we are sharing the method to remove windows product key and use it on a new PC without paying for another one.
Note: You can only use this method for the retail windows product keys. Which means, it will only work on the windows that you bought directly from the Microsoft. It will not work on the pre-installed windows that coming with your laptop or PC.
You may also like these windows articles:
How to Uninstall Windows Product Key and Use It on a New Computer
Follow the simple steps given below to uninstall windows product key from your computer.
1. Find Windows Activation ID
In order to delete the windows product key, you have to find out the activation ID of your windows installation. For this, we are going to use a simple command in the command prompt. To do this,
- Open CMD by searching ‘CMD’ in the start menu or by browsing it in ‘All Programs.’ Be sure to right click the CMD application and choose ‘Run as Administrator’ option from the context menu.
- In the command prompt, type
slmgr.vbs /dlv
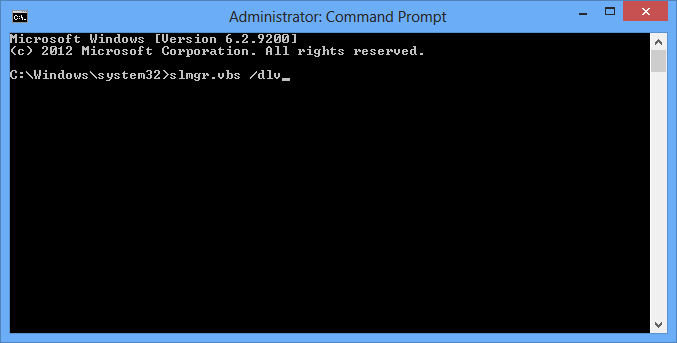
- Press Enter
- After a few seconds delay, the Windows Script Host window will open up. There you can find the ‘Activation ID’ of your windows installation.
- Note the ‘Activation ID’ somewhere. You can’t copy it directly from the window. So, note it down in a paper.

2. Uninstall the Windows Product Key
Now, it is the time to uninstall the product from the windows. Be sure to note down the activation key as the uninstall process will not prompt you for it. To do this,
- Open CMD by following the same steps given in above section.
- In the command prompt, type
slmgr /upk (Activation ID) - Replace ‘(Activation ID)’ with the Activation ID that you have noted down earlier. For example
slmgr /upk 7cfd4296-d862-4afc-af2d-ff3d1b26d6c8 - Press Enter.
- Once you successfully completed the above steps, you will get a message “Uninstalled product key successfully”. If not, check the activation key once again.
3. Install Windows Product Key
After Erasing the Windows product key, if you want to install it on another windows, you should follow the steps given below.
- Open CMD by following the same steps given in above sections.
- In the command prompt, type
slmgr /ipk (Windows Product Key) - Replace “(Windows Product Key)” with the real product key. For example
slmgr /ipk m345d-2k31o-kved3-27m2d-dfo3d - Now, your product key will be installed on windows and you will get a message saying “Installed product key successfully.”
Now, you’ve successfully migrated your windows product key to another computer without losing it. This method is verified by our members and found working. If you’ve faced any difficulties in the process, feel free comment in the following comment box. We will reach you as soon as possible.