


How to Take a Screenshot on Windows: In today’s world with smartphones everywhere, taking a screenshot isn’t really a big deal. Many of us know how to take a screenshot on our phones, but don’t know how to do it on a Windows PC. Why take a screenshot you ask? Well, there are some reasons for taking a screenshot. Say you’re talking to tech support and can’t explain the problem to them.
The easiest thing to do would be to take a screenshot and send to them. You saw a nice image that you can use for your blog or want to send to a friend, the best option is to screenshot it. Whatever the reason might be, you need to know how to do this action. You should know that there are different ways to take a screenshot on your PC. You can use paint, or you can use a utility such as snipping tool. Here’s how to do it:
How to Take a Screenshot on Windows 10
1. Using Paint
- The first step here is to capture the image. You can do this by pressing Print Screen (Prt Sc) on your keyboard, and this will capture the entire display. If you only want a screenshot of the active window, then Alt+Print Screen is your best option.
- The next step will be to open paint, you know that nifty application that you used as a kid to pretend that you’re an artist. You can easily find this application by using the Windows search feature.
- Once you find paint, all you’re going to do is to paste the screenshot on to the program. You can do this by going to the upper left corner of the program and selecting edit then paste. Alternatively, you can use the keyboard shortcut Ctrl+V.
- Finally, you’re simply going to save the screenshot. Some edits can be performed on the image if you wish. Once all editing is done, select the “File” option which can be found in the top left corner of the program. Select Save as, name the file, choose a location to save the file at, choose the format with which the image should be saved (JPG is always the best option) and that’s it. Hit the save button, then you’re done.
2. Using Snipping Tool
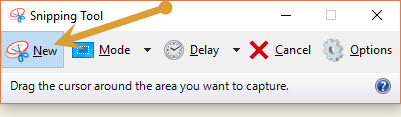

There are utilities like snipping tool that gives you more customization options than the normal windows edit. Snipping tool can be found in versions of Windows starting from Windows Vista and beyond. This utility allows you to screenshot and save the image on the screen and share it with family and friend via email. Here’s how you use it:
- Use the Windows search feature and look for snipping tools.
- Once found open the program. You’ll notice options such as new, cancel and options. New is the one you’ll want since you’re taking a screenshot.
- You can decide the area you want to include in the snapshot by dragging the cursor around said area.
- Once you’re done, a new window with the image will pop up. If you like the image click on file, then save. If you want to share the image via email, then select email the screenshot and that’s it.
3. Taking screenshots using CMD
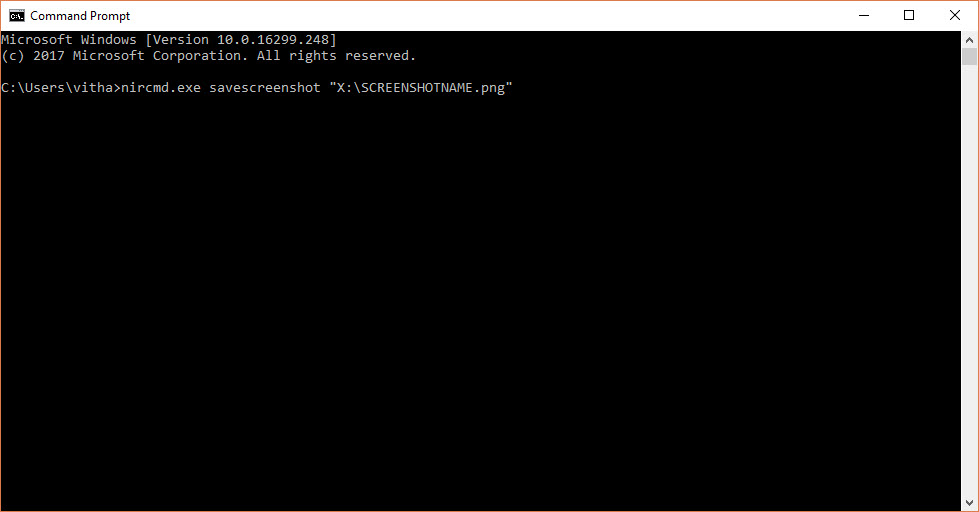

Most of the people don’t know CMD can take screenshots on Windows. Anyone can take a screenshot using a simple command in CMD. By default CMD don’t have any native option for capturing a screenshot, so you need to install a free add-on called NirCmd. First, download and install NirCmd on Windows.
Now open CMD and copy paste the following command.
nircmd.exe savescreenshot “X:\SCREENSHOTNAME.png”
Here replace the X with your local drive where you want to save the screenshot.
In “SCREENSHOTNAME” you can replace with your desired screenshot name.
4. Using “Win Key + PrtScn key”
One of the simplest methods of taking screenshots in Windows is “Win Key + PrtScn key”. This method was introduced in Windows 8 for regular screenshot takers. Using this hotkey method anyone can take a screenshot on Windows 8 with 2 keyboard strokes. Simply click on “Win Key + PrtScn key” both once. It will save the screenshot automatically in User’s Pictures folder. The image will be saved in .png format by default.
5. “Alt key + PrtScn key”
This keyboard will take the screenshot of the currently active Window. It means you don’t need any editor for the cropping job.
6. Other Programs
Apart from built-in shortcuts and tools, you can take screenshot Windows with third-party programs. When coming to third-party screen capturing tool Snagit comes first to mind. Snagit is a paid software with a ton of capturing and editing options.
Conclusion
Now you know how to take a screenshot on Windows 10. Did you find that helpful? Are there some tricks that you’d like to share? Please feel free to let us know in the comments below.