

What is a Windows Restore Point? Restore Point is probably the safest way to keep your PC and your data safe. Essentially, creating a restore point means that you are a record of a point in time when your PC, your files, data or other settings were fine, and everything worked normally. As PC doesn’t really know whether your settings are “right”, you need to create those restore points or point by yourself. Restore Points are great for cases when your computer crashes or something goes wrong, so you can quickly restore it to the previous settings. The benefits of this method are below.
Benefits of Restore Point
Creating a restore point grants you many possibilities and benefits. First, it’s very easy to do and it’s VERY useful. You can do this even if you are a newbie and it takes literally few minutes. The next benefit would be a security. Of course, security is our primary concern when we talk about sensitive data and settings. By creating a restore date, you can easily return your settings to the date you’ve selected as a restore point. Furthermore, you can create multiple restore points and have multiple choices. Beware that this doesn’t apply to hardware errors, so if your HDD isn’t working, you’ll need to get it fixed or buy a new one. We’ll cover this process in-depth in the next few sections. Keep reading.
How to create a restore point in Windows 10
- First, we’ll check if your System Protection is enabled or disabled. In the lower left corner of your desktop click on the Start button.
- Now, search for “Create a restore point” by simply typing your search query as soon as you open the start menu. Also click on it once you find the option.
- In “System Protection” tab, check your drives and see if the protection is On or Off. If your protection is On, then you are good to go. If not, check the step 4.
- If it’s off, left click on Configure button. It will open a new menu and at the top, you’ll see the option called “Turn on system protection” which you need to left-click on.
- Click on Apply and then Ok and the window will close.
- Now once again click Apply in “System Protection” window that is already opened.
- If you want to immediately create a restore point, don’t close this window yet.
- In the same “System Protection” window click on Create. This button is located on the bottom right side. Left click on it will open a new window.
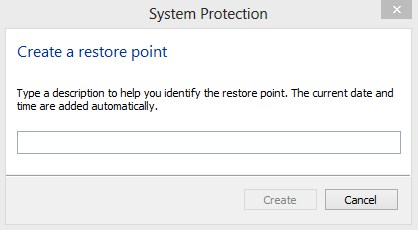
- In this window, you’ll see a “Create a restore point” heading. There is a single blank space. Type something that will help you identify the restore point, e.g December 13th.
- Click on create and wait until it finished creating your restore point.
- Then click on Ok in “System Protection” window, and you’re good to go.
How to create a restore point in Windows 8.1
- Check if your System Protection is enabled following the steps below.
- Click on Start and search “Create a restore point”.
- Left-click on the search result will display a new window called System Properties.
- In that window, select the System Protection tab.
- Now, you’ll see your drive(s) below, and if the protection is turned On, then the next 3 steps aren’t needed.
- However, if your protection is off, click on Configure button underneath the available drives
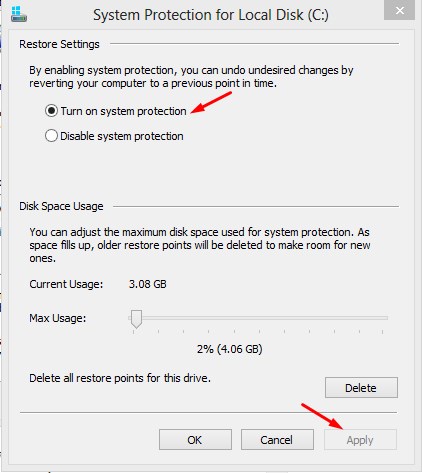
- A new window will open called “System Protection for (Your Drive Name)”. Click on Turn on system protection.
- In the bottom right corner of that window, click on Apply and then on Ok.
- As you protection is now turned On, you can easily create a restore point from “System Protection” window by clicking on Create in the lower right portion.
- In the new window, a text box will appear and you’ll need to enter a restore point name.
- Make sure that the name is easily recognizable in case you need it in the future. The best option is to type the month and day in which you created it.
- Click on Create and wait a few minutes for it to be configured.
- Click on Apply and then Ok.
- Close all windows and you’re good to go.
How to create a restore point in Windows 8
- Windows 8 is an older version than 8.1, but those are very similar. That being said, we’ll once again check if the System Protection is turned On.
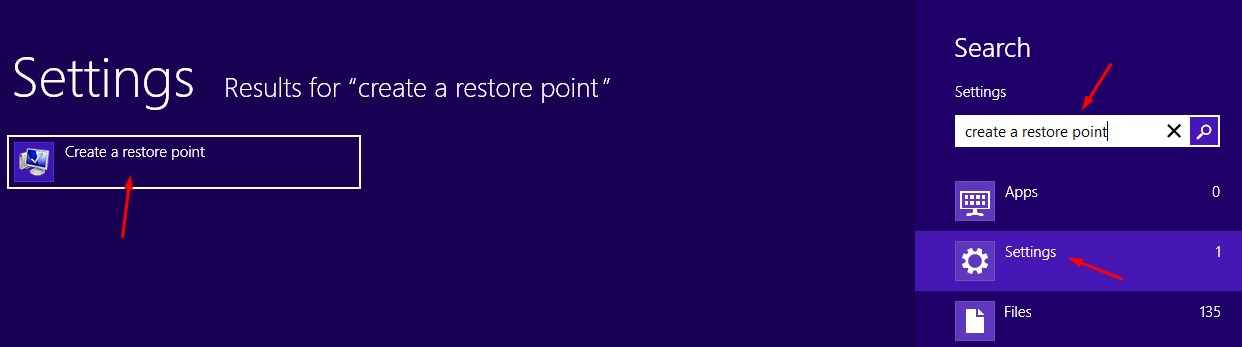
- Open your Start menu and type in “Create a restore point”. You will need to choose the “Settings” option under the search box in order to see it.
- Click on it and “System Properties” window will open.
- Now you need to navigate to “System Protection” tab.
- There, you’ll see the name(s) of your drive(s) and if the protection is turned On or Off.
- If it’s On, then leave it and proceed to step 10.
- If it’s Off, then click on the Configure button just underneath the drives.

- At the top, left-click on “Turn on system protection” and then click Apply in the lower left corner.
- Click Ok in the same window and it will close
- In “System Protection” tab, you can now click on Create, which is in the lower right portion of that window.
- A very long textbox will appear, and you’ll need to enter a name of your restore point.
- Beware that very complex system restore point names aren’t recommended, so use the ones that you can immediately recognize.
- When you enter the desired name, click on Create.
- Wait a few minutes for everything to finish.
- Click on Apply, then Click on Ok and the menu will close. Now you are ready for giving it a try the next time you need it.


How to create a restore point in Windows 7
- Open your Start menu and choose Control Panel.
- In Control Panel, choose System and Security and click the System link.
- You can also complete the first two steps if you open the Start menu and then use Start menu’s search box to search for System.
- If you completed those steps, you can see System Protection link on the left side of the System menu. Left-click on it leads us to the next step.
- A new window called “System Properties will open”. In that window, choose “System Protection” tab.
- Now you can clearly see if your system protection is turned On or Off for selected drive(s). If it’s on, then skip the next 3 steps.
- If your protection is Off, then click on Configure button.
- When the new window is opened, there is an option called “Turn on system protection”, which you need to left-click on in order to choose it.
- If you did that, click on Apply in the lower right corner and then click on Ok.
- Now, we are able to create our restore point and all that you need to do is click on Create button on the lower right side of “System Protection” tab.
- In the textbox that appears, type in the desired name of your restore point and then click Create.
- Wait a few minutes until the process is done.
- When it’s done, click on Apply and then Ok.
- The window will now close and you are ready to use a restore point whenever you need it.
How to create a restore point in Windows Vista
- Open your start menu.
- From there, look for Control Panel which should be immediately displayed and choose it.
- In Control Panel, select System and Maintenance.
- In that sub-menu, click on Backup Your Computer.
- After that, the Backup and Restore Center will open.
- Under Tasks, click on Change Settings.
- The “System Properties” window will open.
- Under that window, click on “System Protection” tab,
- Now you’ll see the list of available drives, or if you have one drive, you’ll see just one.
- Under that list, there is a Create button. Left click on that button opens another window.
- Everything will be familiar now. The long textbox will appear, so you can type in the desired name for your restore point.
- As always, be sure to use the name that you’ll immediately recognize, so you can use it easily in the future.
- Click on Create button and wait until the process is done.
- When it’s done, click on Apply and then on Ok.
- Close the Control Panel. You are good to go now.
How to create a restore point in Windows XP
Windows XP was the first Windows that allowed some of the advanced settings including creating a restore point. If you still use this old operating system, it’s good to know how you can save your PC from problems. The steps are below.
- Open your Start menu.
- Now don’t click your mouse yet, but just hower over All Programs with your cursor.
- Next, do that on Accessories and then System Tools.
- You’ll see that there is System Restore option available.
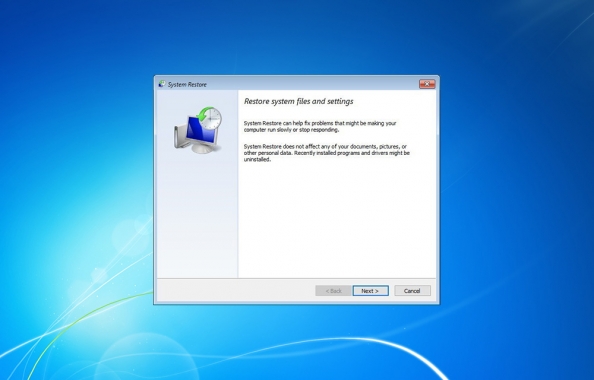
- Left-click on that option and System Restore Wizard will open.
- If System Restore Wizard won’t open, there is a chance that your System Restore is turned off. The next 4 steps will explain how to do it.
- Click on Start and then left-click on Control Panel.
- In Control Panel double-click on System.
- The next thing to do is to left-click on System Restore tab.
- Now look for “Turn off System Restore” checkbox. If it’s checked, your System restore is turned off.
- Uncheck the checkbox and click ok.
- Now open your System Restore Wizard and click on Create a Restore Point.
- Click on the Next button.
- Now try to use a descriptive name that you’ll remember easily. Don’t try to trick yourself, because you’ll probably manage to do it once you forget about the day you created a system restore point.
- In the text box, type the desired name and then click on Create button.
- When you do that, click on the Close button and you’re good to go.
- You can modify whatever you want on your PC and know that you can always get back to the previous settings.
What should you know
Restore points are great when you are planning to modify some important settings on your PC. That being said, you don’t need to do this every day nor every month, but when you think your PC needs it. You can do it once in two months or if you are installing an important update which can change the performance of your PC. Before creating a restore point, be sure to always use the descriptive names in order to use it later. If you follow our steps from the list, there should be zero problems with creating your system restore point and with the process of restoration, which is very simple.
The whole process of creating a restore point is simple and efficient. You don’t need to worry about the safety of your PC anymore, and you can do whatever you want. However, always remember that this method isn’t for hardware, so don’t try to overclock and hope that this will help. Furthermore, this method is available only for the versions of Windows that we mentioned, so if you go below Windows XP, you won’t find it. For Windows 10, you can use this, or simply go premium with your OneDrive account and store your files there, which is a good, but not a better option. Either way, be sure to keep your PC safe and secure, especially if you need it very often. Now that you’ve read our article, you can try and create a restore point for your PC and restore Windows whenever you run into a problem.