

Brief: This article shows how to fix 5.1 channel surround sound not working error in Windows 10 with a few popular methods.
As we know, Windows 10 is a fantastic operating system. However, it fails to impress us when they release the latest update with full of bugs. This situation is most common for Windows 10 users whenever they update, they receive at least 1 or 2 issues.
Recently I faced an issue after upgrading my system from Windows 8 to Windows 10. My system stopped delivering 5.1 channel surround sound and it is delivering the stereo output. The situation annoys me and found a few fixes and I’m writing here for thetechhacker audience.
Before going to start running fixes, make sure you have connected the correct speaker jacks at the backside of your computer. Here the list follows.
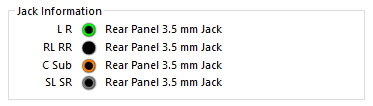

- L R Green Rear Panel 3.5 mm Jack.
- RL RR Black Rear Panel 3.5 mm Jack.
- C Sub Orange Rear Panel 3.5 mm Jack.
- SL SR Gray Rear Panel 3.5 mm Jack.
Method 1: Change the Default Audio Format to 24/96
If you are using S/PDIF for 5.1 channel output and trying to turn on the Dolby Direct Live then you may have the chances of having this error. Here is the fix for the issue.
- Click Windows + R key together to launch run and type the following command.
mmsys.cpl
- It will launch the Sound control panel.
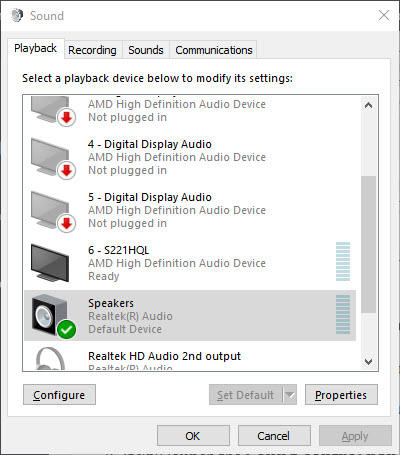
- Now, under the Playback tab, right-click on the default sound device of your system and select Properties.
- In the Properties window, select the Advanced tab and go to the Default Format section.
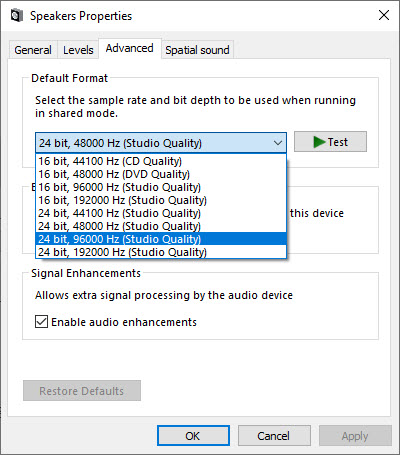
- Now, select 24 bit, 96000 Hz (Studio Quality) from the drop-down and click on “Test” to check if it’s working.
- After the test completes, press Apply and then OK to save the changes and exit.

Method 2: Reinstall the Audio Driver
Uninstalling and reinstalling the default audio driver is one method to fix 5.1 channel not working issue in Windows 10. Follow the steps to reinstall the default audio driver in Windows 10.
- Click Windows + X keys together on your keyboard to launch the Device Manager.
- In the Device Manager window, expand the Sound, video and game controllers section.

- Now, right-click on the Windows default audio driver and select Uninstall device.
- Here, click Uninstall again to confirm.
- Go to the Action tab on the top and click on Scan for hardware changes.
- After this step, the default audio driver will reinstall and appears in the list.

In most of the cases, reinstalling the driver will fix the 5.1 channel surround sound not working error in Windows 10. If the issue still persists, follow the next steps.
Method 3: Update Audio Driver
Drivers are important elements of Windows OS architecture. It is advised to keep your drivers up to date for error-free functionality of your computer. There are plenty of driver update tools available online like, Driver Booster, Driver Genius etc. Or you can manually update the driver if you want.
Read our detailed 19 Driver updater tools for more information regarding the Windows driver update process.
Method 4: Run SFC Scan
A quick SFC scan in Windows OS can fix most of the technical errors. This scan will replace the corrupted system files with a cached copy of the original file to solve the error.
- Open the command prompt and run as administrator.
sfc/scannow - Now, enter the command sfc/scannow and hit enter key to run SFC.
- It will take some time to scan and fix the errors.
- Now restart your computer and check the 5.1 sound.
These are the best practises solving the 5.1 Channel Surround Sound not Working Error in Windows 10. Let us know which method worked for you in the comment section below.