

ADB and Fastboot are that much important in Android devices. The Android SDK enables these two options in your Android devices that allow to Root and Upgrade your device with custom ROM installation. The smartphone manufacturers are producing smartphones equipped with the Android version as they prefer. Why to be settled on the same OS with the irritating buggies there?. You must upgrade your devices manually if there is no Offical launch of the update. ADB and the Fastboot boot mode help to do it. In this Guide on How to set up ADB and Fastboot with Android SDK, we are tutoring you the steps to enable those two useful features. So, follow us.
Set Up ADB and Fastboot with Android SDK: Step by Step Guide
Setting up ADB and Fastboot is that much important. So, we listed the steps to setup them. Carefully follow the steps to do it successfully.
Requirements:
- An Android device.
- microUSB cable.
- Computer
Phase 1. Downloading JAVA and Android USB Drivers
We need Jave platform installed and then USB drivers downloaded with Android SDK Manager. This is how to do it:
- First Download and Install Java Platform (JDK) from Java SE Software Development Kit (SDK) downloads and install it.
- Then, Download Android SDK (installer_rXX.X-windows.exe). Preferably: Click on Other platforms and download the ZIP package file for Windows.
- Extract the zip file to your computer. We extracted in D:\ drive. So now we have,D:\android-sdk-windows.
- Open SDK Manager and wait till it loads (fetches) all the packages.
- Now, select only two packages. Check Android SDK Platform-tools and Google USB Driver options.
- Uncheck everything else.
- Click on the “Install 2 packages…” button.
- Confirm the packages that you selected. Select Accept All.
- Click the “Install” button.
- Wait for the download completion.
- You will get a new screen saying your packages are successfully installed.
- If you again go to the Android SDK folder (D:\android-sdk-windows), you will see the following directories namely extras and platform-tools that are the most important once we need.
Phase 2. Installing and Setting Up ADB and Drivers
Now you have all the files, tools, and drivers. We can proceed on setting up ADB for Galaxy Nexus smartphone. In this part, we will tell you how to use the downloaded USB drivers to set up ADB.
Note: Usb drivers will be different for different devices. So, choose them correctly when installing.
- Make sure USB debugging is enabled on your phone. Read How to Enable USB Debugging.
- Connect your Android phone to the computer and wait till your PC installs all the drivers it could. Most of the drivers would fail to install.
- Go to Start > Control Panel > System > Device Manager.
- In the list shown there, you will see your device.
- Now, Right-click on it, and select Update Driver Software… Option.
- Select the second option from the following screen.
- Again, choose the second option from the next screen as shown below.
- Select Show All Devices and click Next.
- Click on “Have Disk” button. Now browse to D:\android-sdk-windows\extras\google\usb_driver directory and select android_winusb.inf. Click Open. Then click on OK.
- You will get a list of Android drivers. Select Android ADB Interface and click Next.
- Click Yes to the warning message.
- Wait till driver installation gets over.
- Then, Click the ‘Install’ button. Wait till the installation completes.
- ADB drivers are now successfully installed on your computer.
- Now to verify ADB is working fine, go to the platform-tools directory (D:\android-sdk-windows\platform-tools).
- Open Command Prompt. Hold Shift key + right-click anywhere in the folder and select Open command prompt here.
- Type “adb devices” (without quotes) in the Command Prompt window and press Enter.

- If you see the screen as in the screenshot above, you have successfully set up ADB on your computer for your Android phone.
Step 3. Installing and Setting Up Fastboot & Drivers
ADB is now ready and can be used anytime to install tweaks or perform ADB commands. We can proceed with setting up Fastboot for the Galaxy Nexus device.Now, we can look into how to use the downloaded USB drivers to set up Fastboot.
Note: Fastboot USB Drivers may be different for different phones. Bootloader should be unlocked. Search Google for your version if your are unsure about this.
- First of all, Disconnect your Android phone from the USB connector.
- Turn OFF the device.
- Now, Go to Bootloader/Fastboot mode. To do this, Press and hold Volume Up + Volume Down + Power Butoons together.
- Connect your Android phone to the computer
- Wait till your PC installs all the drivers.
- Go to Start > Control Panel > System > Device Manager.
- In the list, you will see Android 1.0.
- Right-click on it, and select Update Driver Software…
- Select ‘Browse my computer for driver software‘ option from the following screen.
- Select ‘Let me pick a list device drivers on my computer‘ option from the next screen.
- Select Show All Devices and click Next.
- Then, Click the “Have Disk” button.
- Now browse to D:\android-sdk-windows\extras\google\usb_driver directory.
- Select android_winusb.inf.
- Click Open. Then click on OK.
- You will be shown a list of Android drivers. Select Android Bootloader Interface and click Next.
- Now, Click Yes to the warning message.
- Wait till driver installation completes.
- Then, Click the ‘Install’ button if you see a warning message.
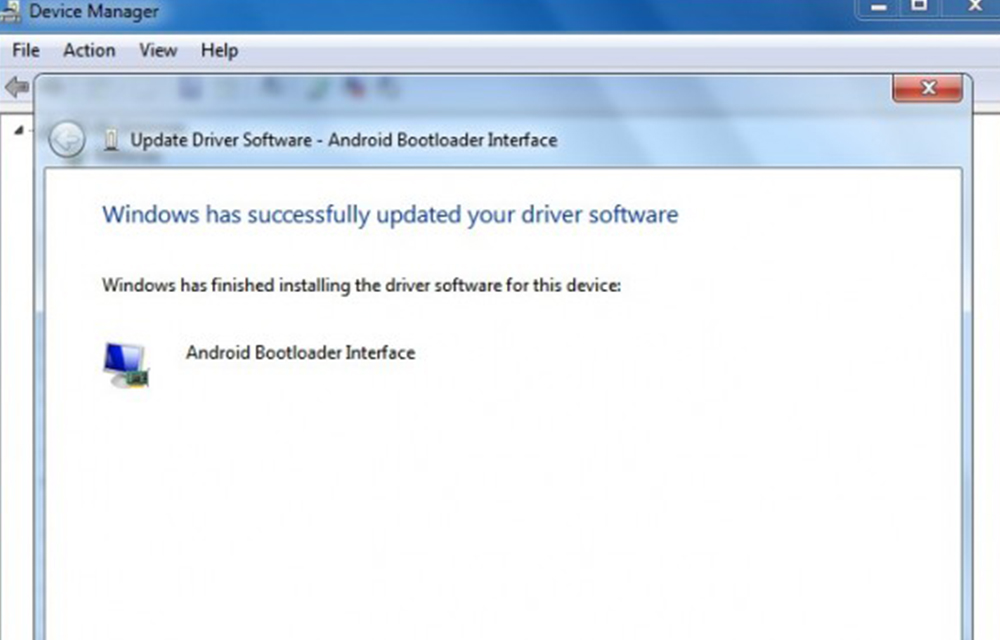
- If you see the following screen. Bootloader/Fastboot drivers are now successfully installed on your computer.
- To verify, Go to the platform-tools directory (D:\android-sdk-windows\platform-tools).
- Open Command Prompt. Hold Shift key + right-click anywhere in the folder and select Opencommand prompt here.
- Type “fastboot devices” (without quotes) in the Command Prompt window and press Enter.
If you see the screen as in the screenshot above, you have successfully set up Fastboot mode on your computer for your Android phone. Now, you can enjoy all the features like Custom firmware upgrade because you device got Rooted entirely. Now enjoy the full features of your device without the limits of the manufacturers. You can access developer options, install Custom Firmware, Upgrade your OS to any latest version of Android and can enjoy the Unlimited features of Android.
Feeling Lucky?… Let us know through your comments. Please comment and let us know your happiness. We are always happy to hear it from you.