

So you need to Unroot android smartphone right? Today we are going to give your the steps for unrooting your android smartphone to roll back all the changes you made by rooting. Before that, have a look at the problems of rooting to get a basic idea about the complications you may face on a rooted android smartphone. Also make sure that your smartphone is at least 70% charged and you backed up all the important data in your smartphone either by some backup apps or using manual methods.
Note: Do this at your own risk, Thetechhacker will not be responsible for any damages caused to your device during the unroot process.
Unroot Android Smartphones using SuperSU app
Please note that this method will only work on those devices which were rooted without a custom recovery. If you have used a custom recovery, you may try the next method.
- First of all, download the SuperSU app from Play Store and install it on your android device.
- Launch SuperSU app.
- Go to Settings, and tap on the ‘Full unroot’ option there.
- When it prompts to confirm the action, just tap continue.
- Now, the process will start and after successful Unrooting, superuser app
will close automatically. - Now simply Restart your android device.
- It is recommended to uninstall SuperSU app after you’ve successfully unrooted the smartphone.
Use ES File Explorer to Unroot Android
If the above method not working for you, you have another simple way to unroot from your smartphone. Follow the steps given below.
- First of all, Install the ES File Explorer app from the play store. Be sure to not move the app to SD card.
- Now, launch the app and tap the menu button.
- Tap on ‘Tools’ and turn on ‘Root Explorer’ by tapping on it.

- Now the smartphone will prompt the action to grant the privileges to the app. Just Allow it.
- Then, go back to the main screen of the app and select ‘/’ in the top corner of the screen (For getting into the root folder.)
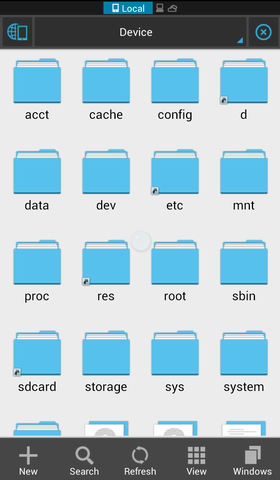
- Then, Go to system > bin.
- Find the ‘busybox’ and ‘su file’ and delete them. In case you can’t find any of them there, just skip to next step.
- Again, go back to system folder then open ‘xbin’ folder and delete the ‘busybox’ and ‘su file’ (if you found anything.)
- In the same system folder, open ‘app’ folder and then delete ‘thesupeuser.apk’ file.
- Now restart your android device and it should be unrooted now.


Now you’ve got the complete step-wise methods to unroot android smartphones. We believe it will help you to get rid of the rooted device. You may also get back your device warranty once you reverted the root. You can also look into our article on Unroot Android Device using Universal Unroot.