


Games are a great way to relax your mind, but when you are really good in gaming and you think that your friends might be interested in watching your games then you must start streaming them onto the internet. The game streaming thing works just like you might have been doing on Snapchat and Instagram. But it’s obvious you would not like to use Snapchat and Instagram for streaming and there comes Twitch which is a game broadcasting platform. How to stream on Twitch using a PC? still, it is a big question for many users. In this guide, we tell you how to stream on Twitch using your PC.
With the twitch, you will be able to broadcast your game live and also embed the stream on your website or a blog. Twitch also has its own User Interface if someone doesn’t have a website then you can share the link on social media for the viewers to watch. Twitch’s broadcasting system is smart and it doesn’t even record if no one is watching the feed. Many people get nervous about setting up new things. Also, you have Twitch Subscriptions feature to access premium content with extra benefits. Today we are going to help you setup Twitch account on your PC so that you can start streaming your gameplay and flaunt your friends with the unique way of playing different games.
Minimum System Requirements to Stream on Twitch
- Intel Core i5-4670 Processor
- 8GB RAM
- Windows 7 or Newer Versions
Setting up Your Twitch Account
Before going to download the broadcasting software you need to do few tweaks to your Twitch account. Follow the below steps to tweak the Twitch page as broadcasting friendly.
1. Create an account or log in to the Twitch account if you already have one.


2. Now go to Dashboard under your profile.
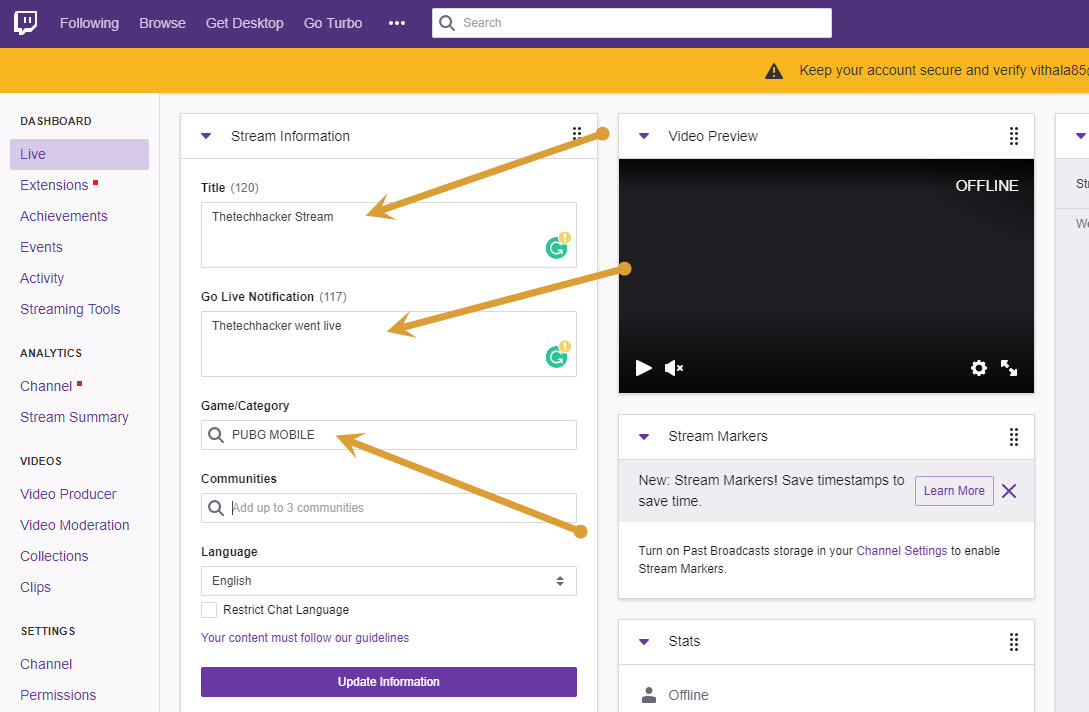

3. Here, under the Live tab on the left side o the page, fill the requirements like Title, Go Live notification, and Game/Category.
4. Once you are done filling the required text, it is the time to set up the broadcasting software.
Streaming with your PC on twitch
Yes it does sounds easy, but there you need a couple of prerequisites before you can start streaming your PC content onto the web. The first one comes to be a special broadcasting software, for Twitch, there are plenty of them but today we will be talking about XSlip which is the easiest option for broadcasting onto Twitch.
XSplit is a free utility which will work for streaming the games, but if you want to make it for your brand website, or anything like that then you will require more advanced features such as custom logos and annotations, these come at a price i.e. in the paid version of the software. We will also add an Open Source Broadcasting Software so you can get more and more features for free.
Getting started with XSplit
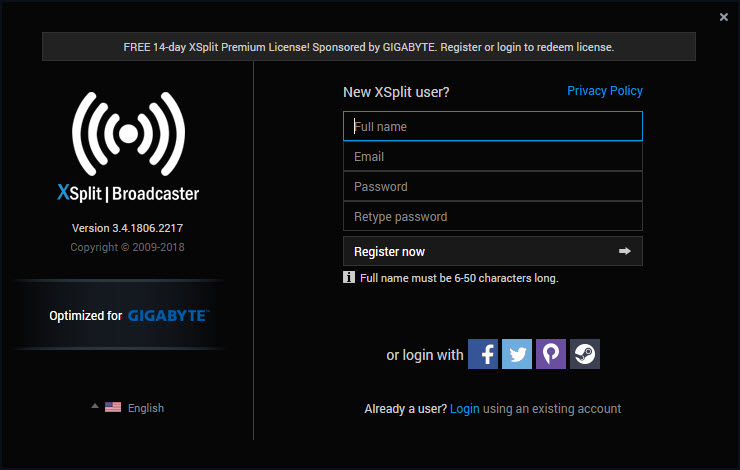

- You will have to create an account on XSlipt and download the server application on your PC.
- Next step will involve your Twitch account and hence if you don’t have one you must make one now itself.
- Start the XSplit software and login into the Twitch account you made earlier or in the step above.
- Open the game on which you would like to start your streaming, and press the Ctrl + Tab button to switch between the applications and switch to the XSplit interface.
- Now click on start Broadcast to begin the streaming of the gameplay.
XSplit also offers an overlay onto the gameplay which will be visible only to you. Also, there will be an option to add webcam footage so that you can record your expression while you play the game. Also if you use the paid version of the application then you can easily add annotations or custom logos of your website or your channel.
Getting Started with Open Broadcaster Software (OBS)
This is a free utility which is a bit more complicated over the XSplit software we talked above. OBS software is available to be downloaded online. One of the flaws with OBS is that it doesn’t allow you to directly login via your Twitch account. You will have to get the stream key from Twitch website, after you login into your account. Another downside of this method will be, that every 7–10 days the key gets expired and you will have to get another one via the same method. Let us learn the steps to set up the same and start broadcasting using the totally free streaming software:
- Install Open Broadcaster Software on your Windows laptop / PC.
- Open OBS and click on settings button found on the lower right corner of the application.
- Once the settings dialogue box pops up you will have to select the Broadcasting settings which you can find in the left – hand pane.
- Under the broadcasting service select the Streaming services, where you will find the option of Twitch. Click on the Twitch option.
- Once it opens you will get an option to input the key that you acquired from the Twitch website.
- Now once done, and when you will start streaming you will get an option to select the video settings which you must choose depending on the internet speed and your computer specifications.
This was just the setting up of the Open Broadcaster Software now in order to start streaming you will have to follow these steps:
- Open the game you want to stream.
- Open “Open Broadcaster Software” and right click on the sources box on the application which you will find on the very first page of the application.
- For the first time, there will be nothing and you will have the option to add new software, now choose Add and from the menu choose Window Capture. Name the source as per your liking and press enter.
- In the next dialogue box, you can choose the window you want to stream which will be of the game.
- Once done you can start streaming onto your Twitch account.
It is quite clear with the Open Broadcaster Software that it is much more difficult to use when compared to the XSplit software. As said earlier the OBS software have a much wider available feature and we can even add a number of different plugins which are available in plenty on to the internet.
There are many different options available in XSplit also, but some of them are paid which makes it a huge task especially for the people who are just starting up with streaming games.
If you have any issue in installing OBS Open Broadcaster Software or XSplit then do let us know in the comment section below. Also, inform us about your experience using any one of the above in streaming the games.
That’s all for now. Please do share your valuable suggestions and feedback in the comment box below.