
We have seen that there are a lot of breaches in recent times thanks to the information on the Internet being trespassed by hackers. While most of these breaches happen due to some kind of malware, there are instances where there is no fault of your own.
Basically, attackers try to intercept your traffic and see which website you are trying to visit and instead give you a different result. On clicking that different result, you will get malware installed and that is how you might get breached. This method is called DNS or Domain Name Server interception.
On the internet, there is a DNS which gives you an IP Address which is allocated for a specific domain name. For example, our website address which is thetechhacker.com is also allocated to a specific IP address. Therefore, if you type our domain name in the address bar of your browser then the DNS server gives you the IP Address related to our domain name and shows you the website.
Basically, you can also find any website on the internet through the IP Address as well. However, it is extremely difficult to remember more than a couple of IP Addresses so domain names are allocated. Now, we have a new protocol known as DNS-over-HTTPS which is same as regular DNS. Just that your DNS requests as well as responses as sent over a secured HTTPS connection.
Prior to this, all the DNS requests and responses were sent over HTTP connection which was easy to trespass so people would be able to find what you are trying to access. With DNS-over-HTTPS, this is almost impossible which means everyone should use this protocol only. This will make your internet browsing a lot more private as well as risks of getting hacked are reduced too.
Now, Google Chrome already allows you to use this protocol for all your DNS requests and responses. However, Google Chrome does not implement this protocol by default as yet so you will have to do it on your own. While the task is a little tedious, our step-by-step guide will make it easier for you:
Enable DNS-over-HTTPS inside Google Chrome
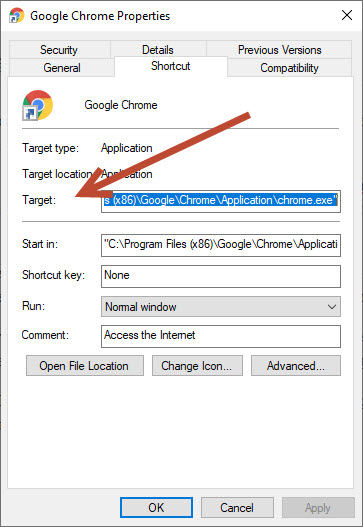
- First of all, go to your Start Menu and type Google Chrome.
- Once you find Chrome, right-click on it and click on the Properties.
- Inside Properties, you will see a Target field. In this Target field, add the following text without removing any text that is already present.

- Basically, add the text given below after the shortcut path:
–enable-features=”dns-over-https<DoHTrial” –force-fieldtrials=”DoHTrial/Group1″ –force-fieldtrial-params=”DoHTrial.Group1:server/https%3A%2F%2F1.1.1.1%2Fdns-query/method/POST - Once you add the text, save the properties.
- Now, open Chrome if it is not open already. If Chrome was open while you were adding text, restart it.
- To check if DNS-over-HTTPS has been implemented, go to this website: https://1.1.1.1/help. Here, you will see that DNS-over-HTTPS column will be marked with Yes.
That’s it. This is how you can implement DNS-over-HTTPS by default for all your browser queries inside Google Chrome. Make sure to use this for staying safe out there on the World Wide Web.
Leave a Reply