

The printer is must-have hardware for many users. Students, businesses, and offices printer have vast uses. Tweaking some settings in Windows 10 will let you add a new printer.
Installing a printer in Windows 10 is a simple process. Microsoft made the installing and connecting printer is pretty easy and simple. To add a printer to Windows 10 you just need to know whether it is a local printer or a shared one. The process is a bit different from each other and in the end you will enjoy easy printer access from Windows 10 PC or laptop.
In this article, you will let you know how to install a printer in Windows 10 in easy steps.
How to install a printer in Windows 10: Local Printer
There are two types of printer installations in Windows 10. The first one is local and other network-based. The local is the printer which is physically connected to a Windows 10 PC or laptop.
When you set up a local printer for the first time, you need to connect the printer to your Windows 10 machine with the help of USB cable. In many cases with the help of the latest PC and printer hardware, both will identify with each other and establishing a connection is simpler. If you are having older hardware, adding a printer to Windows 10 is a bit time taking process. If the printer is old, you need to download supported drivers from the official printer website.
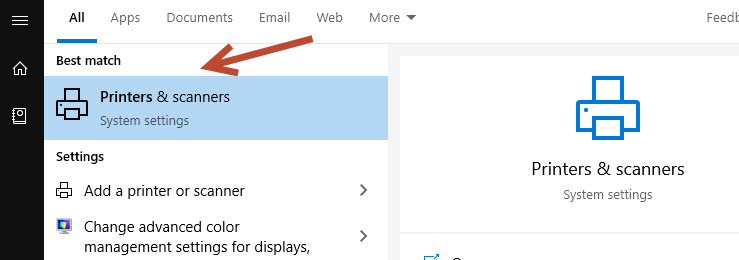

- Type “printers” into the Windows Search box.
- Here, click on “Printers & Scanners” under System Settings in the search results list.
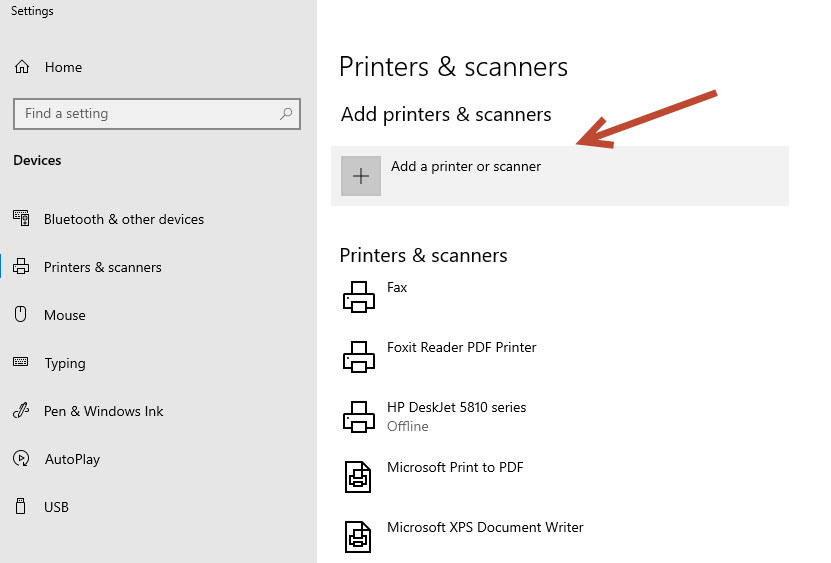
- Now click on the “Add a printer or scanner” option at the top of the Window.
- Meanwhile, the Windows 10 will search for the connected printers to the PC or laptop.
- Once it finishes the scanning it will show a list of available printers connected to the PC.
- Click on the printer you want to utilize and start using it.


If the printer is not found by Windows 10, you manually add the printer from the available option.
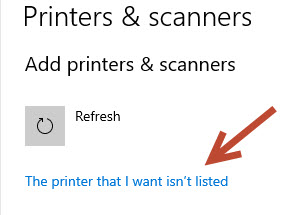

- Click on “the printer that I want isn’t installed” option and it opens a new dialogue box.
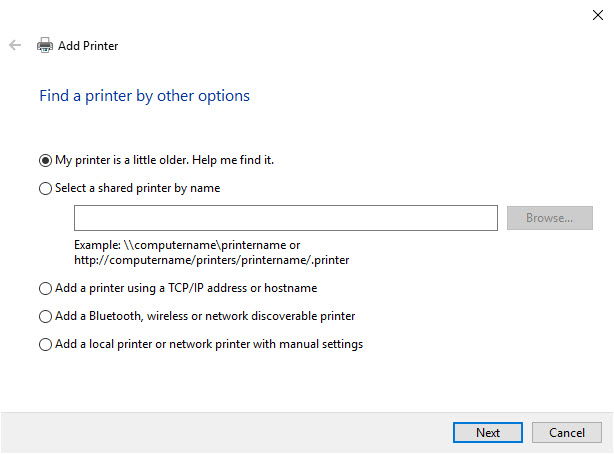
- Here a list of options will appear to find and add the printer.
- Here follow on-screen instructions to add a new printer.
- In most cases option no 5 will work to add a local printer to Windows 10.

How to install a printer in Windows 10: Network Printer
Installing a network printer process is pretty the same as adding a local printer except for a few steps. Before going to start the below procedure, make sure to connect your PC under the same network where the Printer is connected.
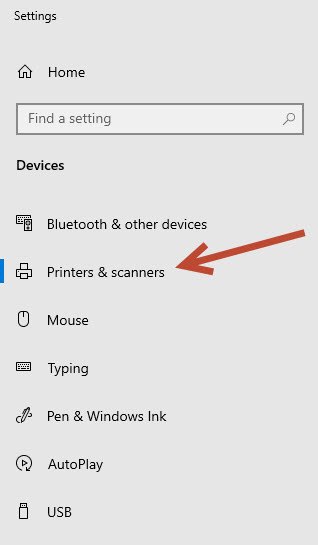
- Type “printers” into the Windows Search box.
- Here, click on “Printers & Scanners” under System Settings in the search results list.
- Now click on the “Add a printer or scanner” option at the top of the Window.
- Now the Windows 10 look for nearby connected printers.
- Once it finishes, it shows the available network printers connected to the same network.
- In the list, click on the desired printer you want to use.
That’s it. Now you connected a network printer to your Windows 10 PC or laptop.
If the printer has not appeared in the Windows 10 scanning results, follow the below procedure to connect a network printer in Windows 10 manually.
- Click on “the printer that I want isn’t installed” option and it opens a new dialogue box.
- Here a list of options will appear to find and add the printer.
- Here use the 3rd option “Add a printer using a TCP/IP address or hostname option.
- Now follow on-screen instructions to add a new printer by providing printer TCP/IP address in the above dialogue box.
- Once you provide the correct IP address or TCP names, Windows 10 will detect the network computer.
That’s it. Now you will have a printer connected to your Windows 10 PC or laptop. If you have any issues or error during the setup, please mention in the comment box below. We always help you to find a solution to technical issues.