


How to create a group in Gmail: Gmail is a very popular email service from the house of Google. It has fantastic features in emailing as no one has in the competition. A user can send attachments, enable alerts, create folders, scheduling emails, labelling and sending group emails.
In this article, we will learn how to create a group in Gmail for sending email to multiple people. This feature will work like a WhatsApp group message. It will let you send an email to a multiple at the same time. You don’t need to send manually to everyone. It is a pretty useful feature for business people, family and other related people.
These are the steps required to create a group in Gmail. These steps are suitable for Web, Outlook, and Thunderbird clients.
Creating a group in web Gmail
Webmail is the most common format for accessing Gmail. The below steps are for creating a group in Gmail webmail.
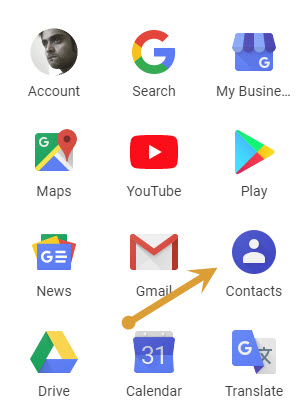

- To create a Gmail group in your webmail, login to your Gmail account. Go to the app drawer on the top-right corner and click on “Contacts.”
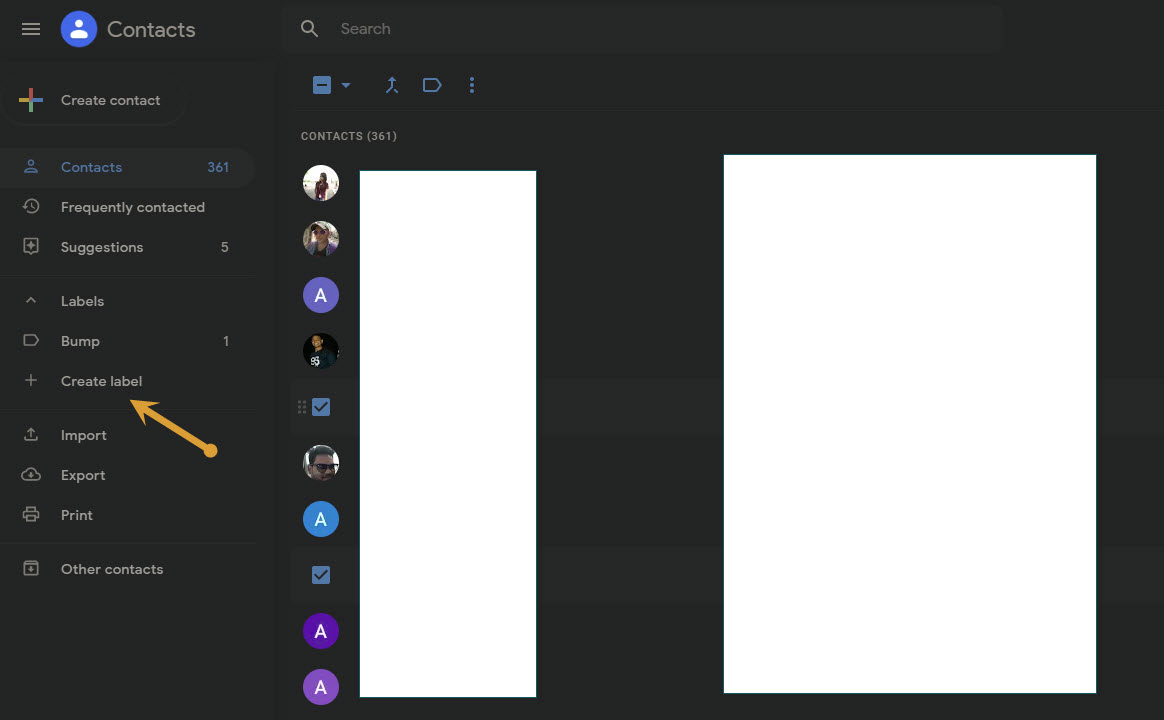
- After clicking contacts, you will see all your contacts as a list. Here you will find an option called labels. For the first time use, you need to click on “Create label” to create a new email group.
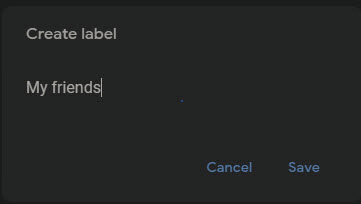
- Give the name to the label you are created such as friends list, colleagues-1 etc.
- When you click on a saved label, it will ask you to add new contacts from your contacts list. To import contacts into this new label, simply select a contact and click its three-dot icon.
- You can add as many as contacts available in the list to a Gmail group.
- Once you added them to a group, now it is ready to send any email in that particular group contacts at one time.


Adding Gmail Groups in Outlook
Many people are using Outlook as a default email client on Windows-based computers. If you are using Gmail in Outlook, these steps will help you to create labels within the Outlook interface.
- On the Outlook home screen, click on “Contacts.” Next, click “new contact group.”
- Here you can add each contact to the group. Or alternatively, you may import them from your Outlook contacts or other address groups.
- Once the group is created, you can use the group in sending group emails.
Adding Gmail Groups in Thunderbird
If you are using Thunderbird as a default email client for your Gmail, you can easily create Groups.
- Click “Address Book” on your top window. Next, click “New list” to start adding email addresses to your group.
- Once the group is created with the emails, now you can use the groups to send group emails.
Conclusion
We are already covered various Gmail related tips and tricks in the past. We come up with more solutions in future as well. For sending group emails on Gmail, follow the above procedures. Let us know your valuable feedback in the comment section below.