

Nvidia control panel missing is the most common problem for Nvidia graphic card users. According to the sources, the Nvidia control panel missing error is caused due to the bad Windows 10 update.
What is Nvidia Control Panel and why it is needed?
Nvidia control panel lets you configure the Nvidia graphics card according to your preferences. It contains settings like Physx configuration, 3D settings, resolution and many more. If the control panel is missing then you are unable to graphic card and it will run with incorrect configurations.
The Nvidia Control Panel is accessed from the desktop context menu. When you right-click on the desktop screen, it will appear in the context menu.
If you are unable to access the Nvidia control panel on your Windows 10 PC, we have a dedicated method to fix the issue. Follow each method one by one and check the issue rectified or not.
Method 1: Restart NVIDIA services to fix NVIDIA Control Panel missing issue
Sometimes the Nvidia Control Panel is missing from the system tray as well as the Desktop context menu. Simply restarting the service may fix the issue. How restart the Nvidia control panel, check out below.
- Open run box by pressing Windows+R on the keyboard together.
- Now type services.msc in the Run box and execute the command by hitting the enter.
- This will open the Services windows and here you will find the currently running services on your PC. In the list, check for Nvidia and restart all the Nvidia services available.
- Or if the service is not running, right-click and click on Start.
Method 2: Update Nvidia latest drivers
Sometimes outdated drivers create these kinds of errors. First, know your driver version and check with the latest version available on the Nvidia company website.
If the driver is running on the older version, then it is advisable to update it with the latest version.
- To check the driver version running on your computer, follow the below steps.
- Press Windows Key + R and in the dialogue box type dxdiag and hit enter.
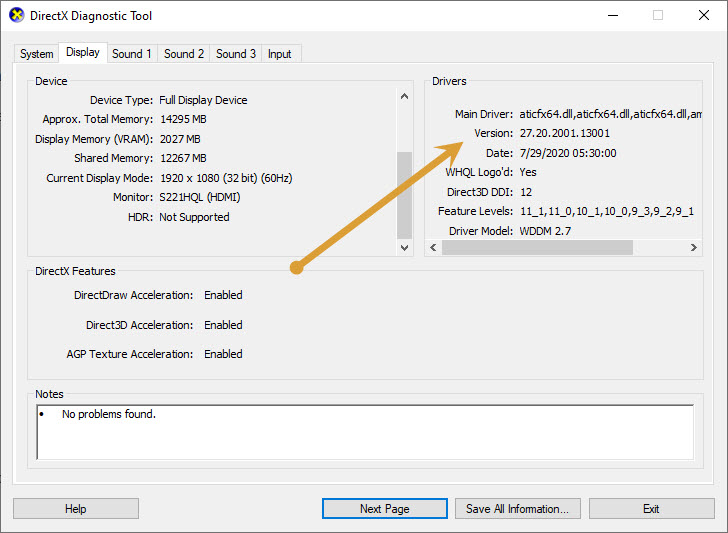
- Now, check the Display tab to know the Driver version.
- Compare driver version number with the latest version number.
- If the installed driver is old, then update it with the latest version.

Method 3: Reinstall Nvidia Control panel
- Press Windows Key + R then type devmgmt.msc and hit enter.
- Expand Display adapters then right-click on your NVIDIA graphic card and select Uninstall.
- In the installed programs list, find the Nvidia Control Panel and uninstall it.
- Now again, Open Control panel by searching in the start menu.
- Now click on “Uninstall a program“
- In the installed programs list, find the Nvidia Control Panel and uninstall it.
These steps will completely remove the Nvidia drivers related software from your PC. Now install a fresh copy of Nvidia drivers from the official website and install it.
Method 4: Reinstall NVIDIA Graphics Driver
This is another method to fix the Nvidia Control Panel not working error. These are the steps for reinstalling Nvidia Graphic Driver.
- Open Device Manager by clicking Windows + X keys on the keyboard and select Device Manager from the list.
- Now expand the Display Adapters option from the list of drivers in the Device Manager and click on the NVIDIA Graphics Card driver and select the Uninstall device option.
- After uninstalling the driver, open Nvidia Drivers web page and select the appropriate driver software which matches your graphic card model. Download the driver and install it on your PC.
Final Thoughts
Based on the type of issue in your machine, any of the above methods will surely work for you. If unluckily non of them worked for you, then try to contact the Nvidia Help Forum and raise a query in their site.
Let us know your valuable feedback in the comment section below.