

How To Change Your Monitor’s Refresh Rate Settings In Windows 10
For the most part, you like the default refresh rate of your monitor on Windows 10. However, if there’s a need to change or tweak the refresh rate of your monitor, I’ll show you how to do it. Before we move on to modify the refresh rate settings in Windows 10, it’s worth noting that…

How To Change Your Monitor’s Refresh Rate Settings In Windows 10
For the most part, you like the default refresh rate of your monitor on Windows 10. However, if there’s a need to change or tweak the refresh rate of your monitor, I’ll show you how to do it.
Before we move on to modify the refresh rate settings in Windows 10, it’s worth noting that you cannot tweak the refresh rate of your monitor beyond the capability of a screen.
For instance, if you have a 60 Hz monitor, you cannot increase the refresh rate or decrease it. But, if you have a monitor of 144 Hz, you can decrease it (but not increase it).
By now, you must be aware that the least refresh rate of modern monitors is 60 Hz. Now, let’s move on to the solution.
How To Tweak Your Monitor’s Refresh Rate Settings In Windows 10?
As an additional note, if you’ve recently connected a 144 Hz monitor using the DisplayPort, you’re good to go if you’re wondering if you need to change any settings.
In case you’re using an HDMI cable for 144 Hz monitor, you need to use the DisplayPort instead. The HDMI port supports up to 120 Hz refresh rates. So, you cannot go beyond that using any of the options in Windows 10.
Coming down to our point, if you want to modify the refresh rate settings in Windows 10, you need to follow the steps below:
- Head to Windows settings by searching in the start menu.
- Click on System Settings.
- Head on to the Display settings.
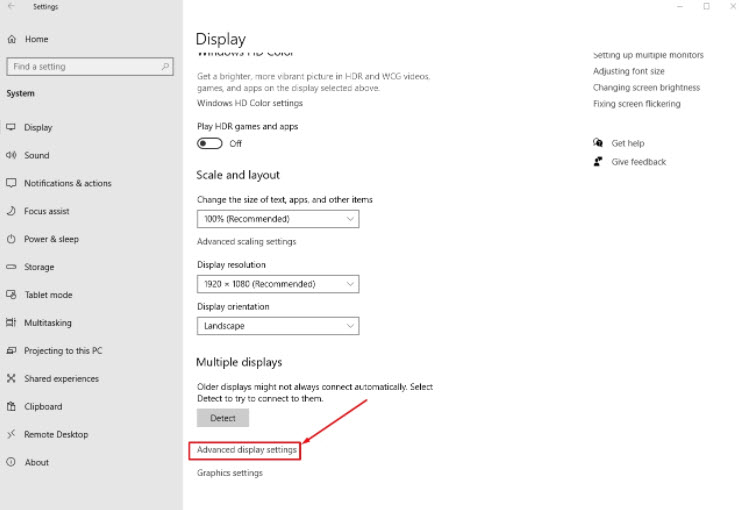
- Next, click on “Advanced display settings” at the bottom of the screen as shown in the image above.
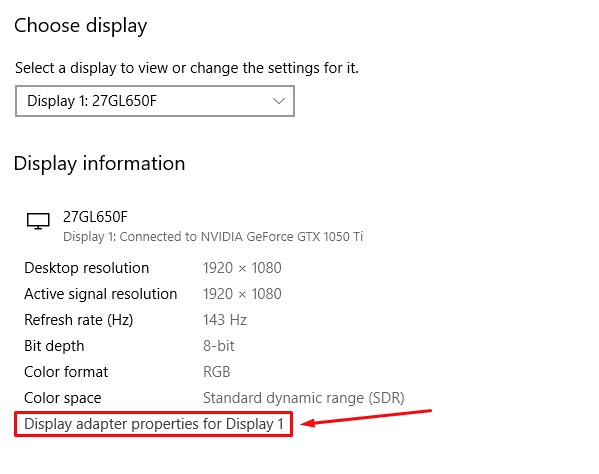
- Head on to next screen and click on “Display adapter properties” as shown below.
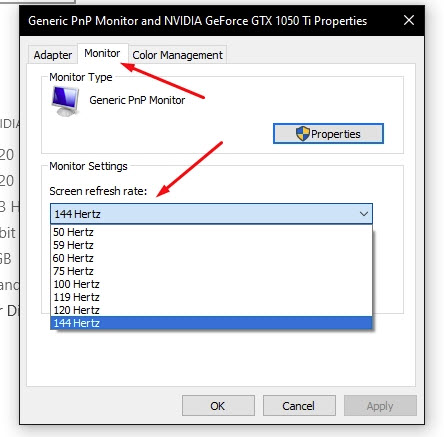
- Now, another window will pop up. Here, you have to go to the “Monitors” section and simply change the refresh rate to whatever you want it to be as shown in the screenshot below.
That’s it! You’re done.
In addition to the solution mentioned here, you might want to check your monitor settings (using the menu button on the monitor) to see if you’ve changed anything there. And, for gaming, you’d need to explore the NVIDIA control panel or the equivalent for Radeon graphics and the video settings in-game to make sure that you’re getting the perfect refresh rate you expect from your monitor.
I hope this helps you to change the refresh rate of your monitor on Windows 10. If you’re still having issues, let me know in the comments below!
More in How-to
How to Fix the ‘No Internet’ Warning When You’re Actually Online
Learn how to fix the misleading ‘No Internet’ warning in Windows even when you’re connected.
How to Speed Up Pokémon GO’s Refresh Rate on Your Phone
Everyone who has played Pokémon GO for more than a day has noticed that the game can be very unresponsive at times. Most of the game is about hunting for Pokemon in the real world. Although it is less about graphics, the speed of the game has always lagged behind our phones. Movement, in particular,…
Steps Required To Burn ISO Images In Windows 10
Microsoft completely refreshed the file explorer in Windows 10. Moreover, the Redmond-based company changed the name from file explorer to Windows Explorer. The company also removed the control bar located below the address bar. In Windows 10, you will view three ribbons that resembles the grouped controls identical to Microsoft Office apps. If you look…
The week in tech, minus the noise.
New reviews, fixes and the stories that matter — once a week, straight to your inbox.
We only use your email to send the newsletter. Unsubscribe any time. See our privacy policy.
Comments