

The biggest stumbling block after a good Graphics Card that affects gamers is the RAM. People are often heard complaining that even having a “bigger” RAM doesn’t solve the game lag problem.
As you may already know, the data in the secondary storage is loaded in the RAM before processing, since the speed of the RAM is greater compared to the Hard Disk (even an SSD). This means, even though you install a game onto your Hard Drive, it will be ultimately loaded to the RAM when running. And if you have heard of the concept of Virtual Memory, you know that the lower the RAM is, higher the frequency of accessing the hard drive, and that means the slower the processing becomes. This means you need a considerable amount of RAM while playing a good computer game.
Your computer’s RAM is shared among all the processes that are running on the PC. In this case, priority is always attached to the current process. But if there are lots of background processes such as an Anti-Virus software, Daemon services, Update services, and agents, etc. will eat up your RAM.
Here are some tips for you to free up the memory, when you’re playing a computer game.
Use Game Booster
One of the easiest and reliable ways to boost gaming experience in Windows 10 and previous versions is to use the Game Booster feature of RegInOut System Utilities. RegInOut comes with an extreme gaming profile which turns off unwanted services and makes computer lighter for games. Download it here: Best Game Booster 2016.
Run ReadyBoost
If you’re using Windows 7 or higher, you can use the ReadyBoost feature provided by Windows itself. It allows you to extend the memory using a Flash Drive, assuming that it can be used as a partial RAM if that is capable.
Here is a summary of the requirements that a flash should have for it to support ReadyBoost.
- 256 MB of storage space
- access times of 1 millisecond or less,
- a read speed of 2.5 MB per second for 4 KB random reads, along with
- a write speed of 1.75 MB per second for 512 KB random writes
If your Flash Drive satisfies these requirements, you can use it for ReadyBoost.
Plug-in your Flash Drive to the PC, Go to the ReadyBoost tab of the Properties window of the Flash Drive to enable ReadyBoost.
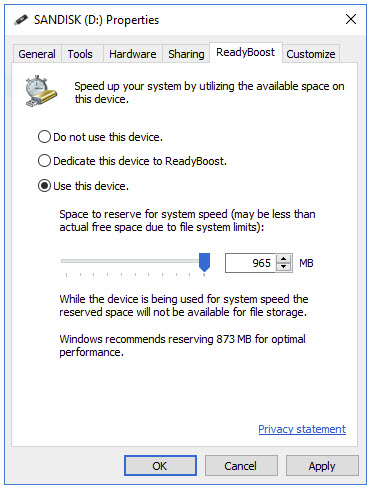

Enabling ReadyBoost can’t rival the benefits you can get by adding more RAM, but it translates into some performance improvement. Windows disables this feature if you have an internal solid state drive because it will provide you a superior storage performance (Virtual Memory).
Use Windows Task Manager
The simplest way to check what eats the RAM on your PC is the Task Manager.
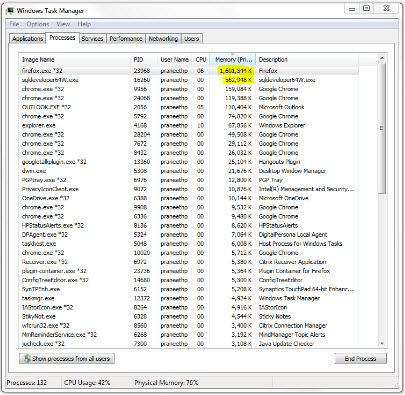

You’ll see what processes eat up the most of your computer’s memory. You can kill them before starting your game, to improve the game performance.
Click on Show Processes from all users to view the entire list of processes running in the background. But don’t kill other people’s processes, especially if they are system processes. Rather take a note of which process uses more RAM so that you can disable some system processes/services if you don’t need them.
Go to the Performance tab, click on Resource Monitor and finally click on the Memory tab to view more information.
When you found out the processes which use a large amount of memory, you can either disable the services or uninstall the unnecessary programs.
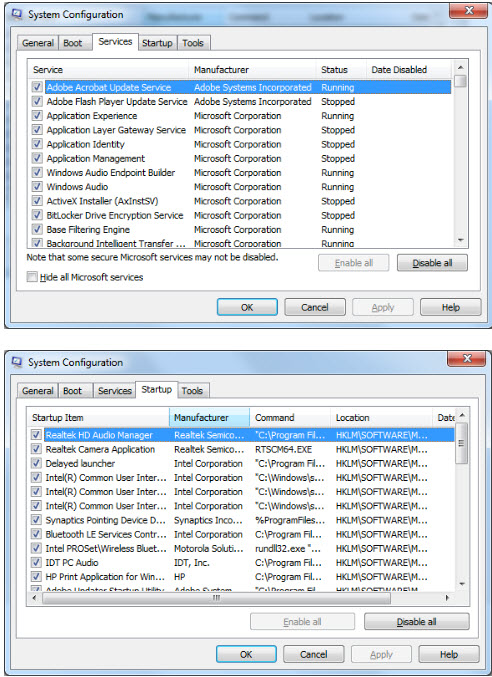
Disable Or Remove Unnecessary Software
Once you have identified the heavy processes, you can either disable them or uninstall them for good.
To see the Services, fire up the System Configuration window. The easiest way is to execute the MSConfig command in the Run window. You can open the Run window by pressing Windows Key + R. Now navigate to both the Services and Startup tabs, and disable the services you don’t need. For instance, if you have installed Apple iTunes, it will also be running a bunch of background services, which are mostly not useful when the iPhone / iPad isn’t connected. Hence, you can safely disable them.

Another helpful tip for Windows 10 users is to disable the Indexing Service. This service keeps on running in the background and performs File Indexing. As a result, the hard disk keeps on running forever. Disabling this service results in giving a significant boost to the computer’s speed.
Install A RAM Cleaner
If you still face slowness on your computer, and you think it’s because of the RAM, you can try out a third-party memory optimization tool. There is various range of tools available, however, make sure to avoid malicious apps while you’re hunting for the RAM.
Add More RAM
The last resort is installing a new RAM. However, make sure you go for a compatible RAM and purchase only the right kind of RAM or else it would be of no use. Keep in mind you must also be knowing about the bus speed (frequency) of the existing RAM modules when you’re buying a new one, since their bus speed must match when you install them together.
As a side note, check the architecture of the Processor as well as the Operating System. If you have a 32-bit Processor, you can only have a maximum of 4GB RAM at best. The same scenario is applied when you have a 32-bit Operating System installed, even though you have a 64-bit Processor. Simply put, if either the Processor or Operating System is 32-bit, you only can use up to 4GB memory. If you have a 32-bit Operating System on a 64-bit Processor, you should install a 64-bit Operating System to make use of the total amount of the RAM.