

Your Windows 10 laptop may go slower and slower over time. There are several reasons why your Lenovo laptop is acting up and gone painfully slow over time. Run through the checklist given below to fix this issue permanently.
Recommended:
Laptops tend to slow down as usage increases. They should be maintained well enough to cope with the threat of malware, junk, and other errors. Using a well-reputed software such as the Intel Software Partner, RegInOut for regular maintenance would help you overcome speed issues with your Lenovo machine. You can clean system and browser junk, optimize PC settings, boost internet speed and run the ultimate Game Boost feature for achieving maximum speed. Use it to your advantage today by downloading it from the official website: RegInOut System Utilities.
End Resource Intensive Processes
Some application processes are eating the entire RAM available. 3D Rendering programs, compiling programs, multimedia applications are a few examples of high resource intensive applications that are known for making a laptop slower. Terminate all of these processes.


- Type Resource Monitor in the Search Box on the Taskbar.
- Open the Resource Monitor tool from the Search Results.
- Click the CPU tab.
- Click the Average CPU column head.
- Resource Monitor will rearrange all processes from higher to lower Average CPU usage order.
- End all highly resource intensive processes one by one. To do so, right-click a process and select End process.
You can also use the Game Boost feature of RegInOut for this purpose. It will shut off some of the unwanted services for a limited duration. This hack can boost Lenovo’s laptop speed in Windows 10 quickly.
Kill Malware
An infection can make your computer pretty slow. It is a known fact that a maxed-out CPU is typically a sign of virus/malware infection. It has a tendency to slow down the operating system performance.
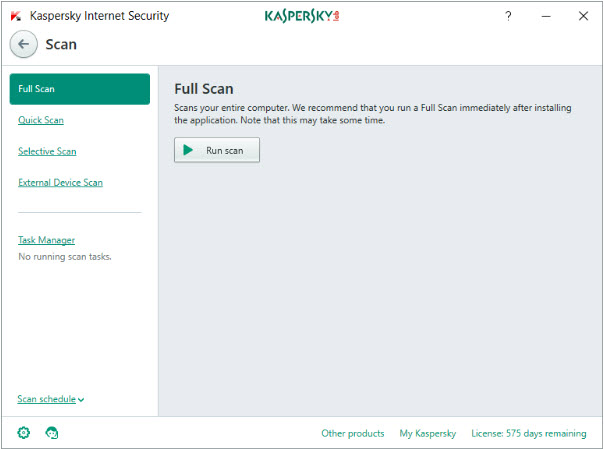

For Kaspersky Internet Security
- Click the upward More icon on the far right corner of the Taskbar.
- Click your Antivirus and security software icon.
- Click the Scan icon in the main user interface.
- Click the Full Scan tab on the left panel.
- Click Run Scan.
Use ReadyBoost Feature
The ReadyBoost feature in Windows uses a USB for caching mechanism. If your USB doesn’t support this feature, the Drive Properties will display the following message: “This device cannot be used for ReadyBoost.”
Connect a USB to your computer.
Wait for the AutoRun prompt to appear. Once it appears, choose the Speed Up System option.
If no AutoRun dialog appears, double click This PC icon on the Desktop. Right-click the USB stick icon and select Properties. Click the ReadyBoost tab.
Select either Dedicate this device to ReadyBoost or Use this device. The former reserves the entire storage space on your drive for ReadyBoost whereas the latter allows the user to specify the amount of space to be used.
Optimize System Settings
You’re experiencing sluggish performance because your operating system is not configured with performance-favoring settings. Tweaking your system in the right manner will improve its performance dramatically.
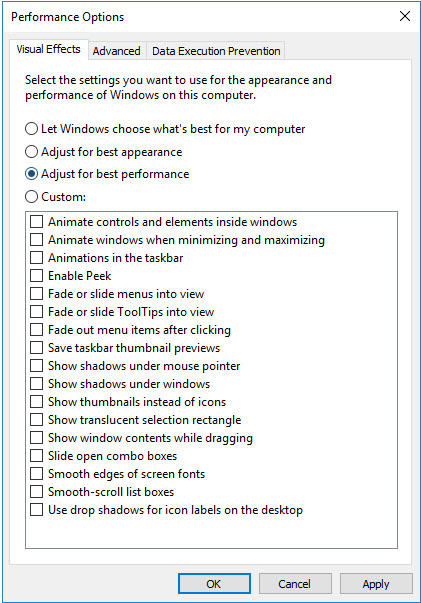

- Right-click This PC icon on the Desktop.
- Select Properties.
- Click Advanced system settings link in the left panel.
- The System Properties dialog box will be opened.
- Click the Settings button under the Advanced tab.
- Click Visual Effects tab.
- Select Adjust for best performance.
- Click OK | OK.
Uninstall Unused Apps
Remove any applications you no longer use to free up storage space and ensure availability of sufficient space for other files.


- Click the Start icon.
- Click Settings | System.
- Now click the Apps & Features tab.
- Select Sort by install date option from the second drop-down box.
- Remove all programs that you don’t need anymore. To remove a program, select it and then click the Uninstall button.
Kill Unwanted Services
Your computer runs a lot of code in the background, most of which provide little or no benefit. All services are listed in the Services program. Stop resource-intensive services and disable them from running at the startup interval.
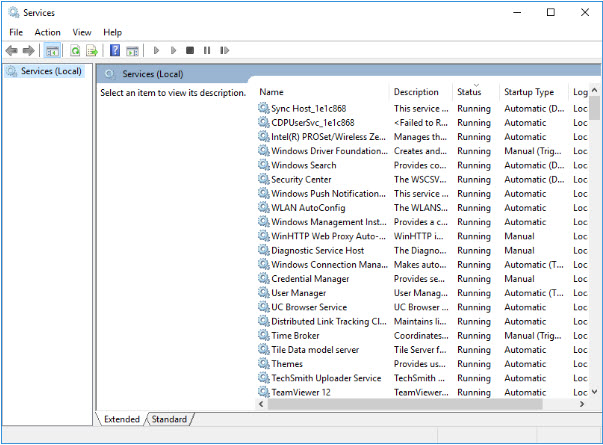

- Press Windows Key + R keys simultaneously.
- Type Services.msc in the text box, click OK.
- Just click the Status column head to sort the services by their current status.
- Right-click a non-important service, select Properties. Click the General tab. Set the Startup Type to Disabled.
- Click on Stop.
- Click Apply, and then OK.
- Repeat the same procedure for every single unwanted service.
Defrag the Hard Drive
The process of defragmentation picks up pieces of data spread across various parts of the hard disk and puts them back altogether. This process, which is carried out using a pre-installed tool named as Disk Defragmenter, may take several hours depending on the level of fragmentation and used disk space. It is recommended to defrag the hard disk on a regular basis as your OS constantly writes, deletes, and amends files.


- Type Defrag in the Search Box on the Taskbar.
- Open the Defragment or Optimize Drives from the Search Results.
- You have the list of all partitions on your screen.
- Select all of them, click the Optimize All button.
Close System-Tray Icons
Some applications tend to sit quietly in the background with an icon in the system tray area of the Taskbar. Quitting such icons will declutter the notification area and speed up your PC.
![]()

- Click the Upward arrow icon on the far right corner of the Taskbar.
- Right-click a system tray icon, select Exit or Quit option.
Optimize Startups
Startup items also called as Login items, usually spring into action without informing the user. This way users end up getting a lot less from their compute than it is capable of, as a chunk of it’s resources are being eaten up by Startup Items. Do away with them for good to get the max out of your Lenovo laptop.
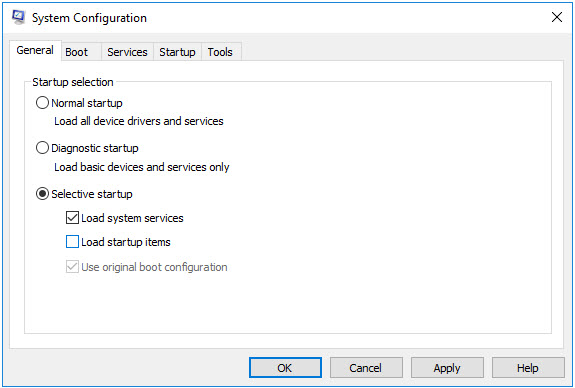

- Press Windows Key + R.
- Type MSConfig in the newly open dialog box.
- Click OK or press Enter.
- It opens up the System Configuration tool.
- Click the General tab, choose the Selective startup option.
- Don’t de-select the Load system services check box. Only uncheck the Load startup items check box.
- Click Apply, and then OK.
- Restart your computer for the changes to take effect.
Free Up Disk Space
Delete large or unused files stored by your operating system in the cache, temporary folders, temporary Internet files, setup extracted contents, and so on. You can free up the disk space right from within the Disk CleanUp tool.
- Double-click This PC icon on the Desktop.
- Right-click the system drive and open up Properties.
- Click the General tab.
- Click on Disk CleanUp.
- Please wait until your disk is analyzed.
- Click the Disk CleanUp tab in the newly opened dialog, and select all items that you can see on the screen.
- Click OK.
Note: To delete temporary files used by critical system components, use the Clean Up System Files button. In such a case, Disk CleanUp will close and re-open again.
Download Critical Updates
Getting the latest Windows updates and patches will speed up your computer. Here’s how to get them:
- Click Start, and then Settings.
- Click Update & Security | Windows Update.
- Now click the Check for Updates button.
Uninstall Third Party Browser Toolbars
Freeware programs often bundle toolbars and other junk tools as part of their distribution strategy. A browser toolbar resides within a web browser’s window and slows down your browser to a considerable extent.
Internet Explorer
- Open the browser.
- Press Alt key to show the menu bar.
- Click Tools, select Manage Add-Ons.
- In the Show drop-down box, select All Add-Ons.
- One by one disable all the browser toolbars. (Select > Disable)
- Click Close.
UC Browser
- Click the User Profile icon on the upper right corner of the screen.
- Select Extensions.
- Using Disable button, one by one disable each extension.
Google Chrome
- Click the three dots icon.
- Select More Tools | Extensions.
- Uncheck the Enabled box in front of each extension displayed in the list.
Mozilla Firefox
- Press the Alt key on the keyboard.
- Click Tools, select Add-Ons.
- Click the Extensions tab.
- Click the Disable button ahead of every extension.
Opera
- Click the Opera icon.
- Point to Extensions, select Manage Extensions.
- Disable all the extensions.
Configure Minimal Audio Effects
Audio Effects are a unique set of effects produced to accompany action and supply realism. Setting minimal audio effects will greatly enhance your laptop’s performance.
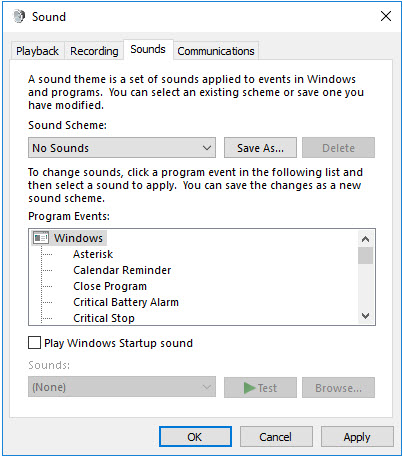

- Type Sound in the Search Box on the Taskbar.
- Open Sound from the Search Results.
- In the new dialog that opens, click the Sounds tab.
- Select the No Sounds option in the Sound Scheme drop-down box.
- Uncheck the Play Windows Startup sound box.
- Click Apply, and then OK.
Turn On Write Caching
Write Caching is a mechanism that improves Hard Disk Drive (HDD) read/write performance. Enabling this feature will greatly increase computer performance.
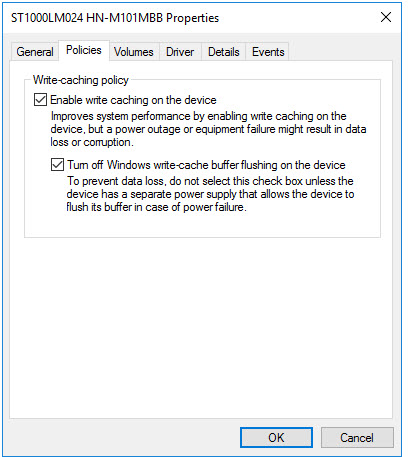

- Expand the Disk Drives node.
- Right-click the hard disk, select Properties.
- Click the Policies tab.
- Select the checkboxes for these 2 options:
- Enable write caching on the device.
- Turn off Windows write-cache buffer flushing on the device
- Click Apply | OK.
Ensure Power Configs in Favor Performance
Some power plans maximize the screen brightness, consume more power and slow down your laptop. Ensure your current plan is set to use minimal brightness.
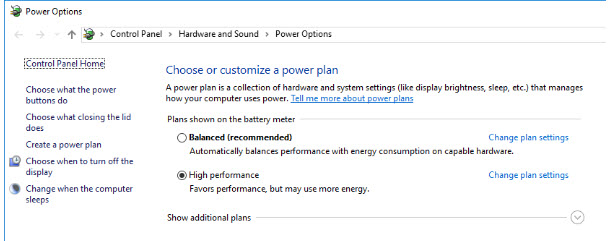

- Press Windows Key + X.
- Select Control Panel.
- Click Hardware and Sound | Power Options.
- From the power plans, you see on the screen, select High Performance.
Note: If the option is hidden, click the Downward arrow icon.
Turn Off Unneeded Windows Features
Windows Features are bundled with your operating system. Though it is not possible to uninstall them, you can safely turn unnecessary features off.
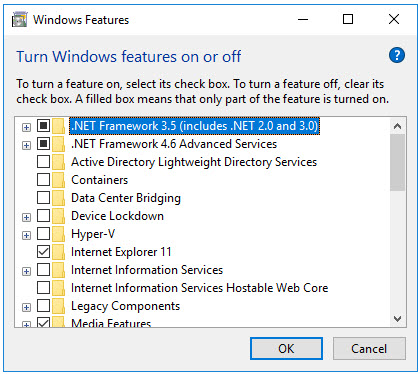

Open the Control Panel.
- Click Programs | Programs, and Features.
- Click Turn Windows features on or off the link on the left.
- You have a list of all Windows features on your screen. Uncheck any features you wish to disable.
- Click OK.
Turn Off User Account Control
Temporarily disable Microsoft’s Data Execution Prevention, a security feature, for performance enhancements.
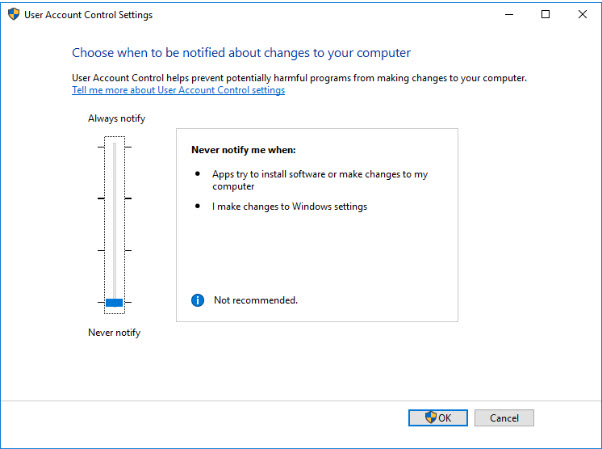

- Type Change User Account Control Settings in the Search Box on the Taskbar.
- Open it from the Search Results.
- Move the slider to the extreme bottom (Never notify).
- Click OK.
- A system reboot is necessary to apply new changes.