


PowerShell is a handy profile to execute customized command lines in one click. It allows you to customize the environment that you want to open it.
A PowerShell profile is a script that runs when PowerShell starts. You can use the profile as a logon script to customize the environment. You can add commands, aliases, functions, variables, snap-ins, modules, and PowerShell drives. You can also add other session-specific elements to your profile so they are available in every session without having to import or re-create them.
PowerShell features are not available out of the box. Due to some security measures, the use of scripts is disabled. However, you can create a PowerShell profile on Windows 10 in easy steps.
How To Create A PowerShell Profile On Windows 10
The process of creating a PowerShell in Windows 10 is a pretty simple process. Follow the below steps.
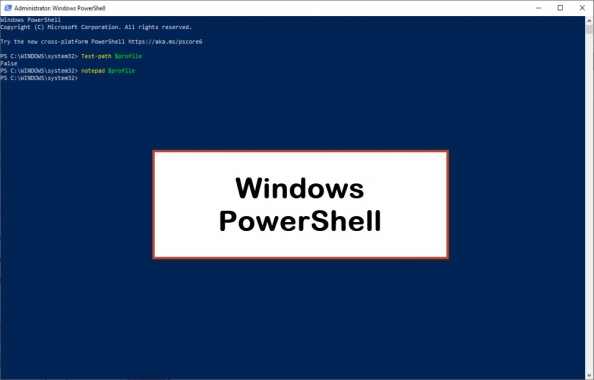
- Open the PowerShell with administrative privileges. Or you can check if you might have created a profile for PowerShell before then open it by running the following command.
Test-path $profile - If the command returns ‘True’, you already have a profile. You can access it by running the command below.
notepad $profile - If the command shows ‘False’, then you do not have a PowerShell profile. You can create it with the command below.
New-item –type file –force $profile - After opening this command, a new notepad will open. Here you can add new profiles to it. Also, change the execution policy in PowerShell. This will allow the file to be loaded when you open PowerShell.
- Run the command below and close PowerShell.
Set-ExecutionPolicy RemoteSigned - By default, the profile file will be created in the following location.
C:\Users\YourUserName\OneDrive\Documents\WindowsPowerShell
- The profile is works for current user only. If you have another user working on the same system, they will not have access to it and running the test command when signed in with the other user account will show as ‘False’.
If you have done the above steps, then you have successfully created a PowerShell profile on Windows 10. To access the created profile you need to use the below command.
notepad $profile
You can do great things using PowerShell. Microsoft has given some detailed PowerShell profiles on its website.