
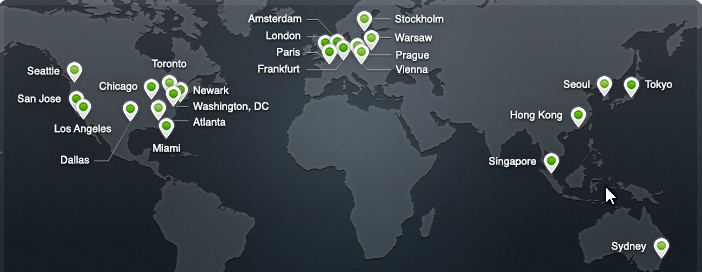
A good content delivery network (CDN) can speed up your site at very faster rates. If your site is rapidly growing and the server is not powerful enough to maintain the data loads, a CDN will help you a lot. A CDN will allow you to store your site data in several locations around the world. If a foreign visitor visits your site, the data is accessed from his nearest location.
Small site or blog owners can’t spend money on VPS or Dedicated servers. Most of the CDN services very cheaper than VPS and Dedicated servers pricing. CloudFlare is one of the most popular CDN services with best features and pricing.
What is CloudFlare CDN?
CloudFlare distributes your content around the world so it’s closer to your visitors (speeding up your site). It serves your content Worldwide, also minify Javascript of your web pages and protects your website from a range of online threats from spammers to SQL injection to DDOS.
CloudFlare-powered websites see a significant improvement in performance and a decrease in attacks.
It would also serve the cached version of your web pages when your web server goes in maintenance or unavailable mode. Surprisingly you can avail all these offers for free upon signup.
Features of CloudFlare CDN
CloudFlare offers some most valuable features needed by a website. It has features like Analytics, Cashe Purge, Rocket Loader, Development Mode, Automatic IPv6, Hotlink protection and Auto Minify.
How to setup CloudFlare CDN in WordPress?
CloudFlare setup depends on the certain web hosting companies. Some web hosting companies have integrated the CloudFlare app in their cPanel. To install CloudFlare simply login to the cPanel dashboard and look out for the CloudFlare logo under advanced settings.
If you found the icon, you can configure the settings manually or by updating DNS records. You can find the CloudFlare icon in popular hosting companies like Bluehost and HostGator.
CloudFlare Automatic Setup in cPanel Dashboard
- Click on the CloudFlare icon under the Advanced Tab. Next, select the domain name you want to add to CloudFlare.
- Next, click on the gray icon to turn on CloudFlare. After clicking on the icon gray icon turns into orange color.
CloudFlare Manual Setup
- For manual installation log on to CloudFlare website and signup for a new account.
- Next, add your website by entering the URL.

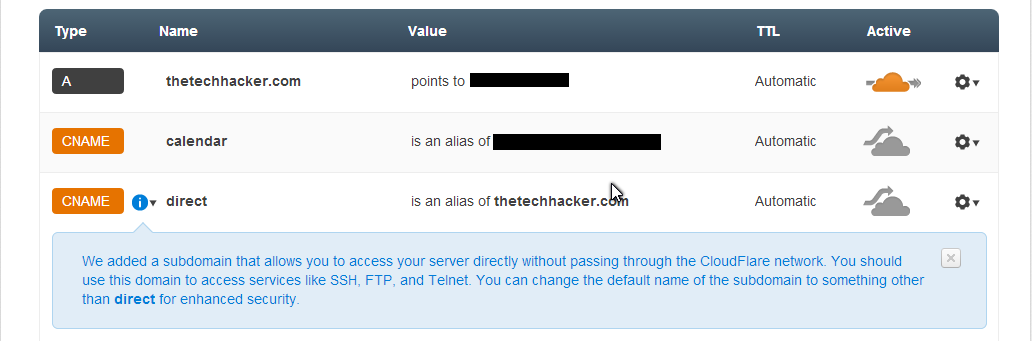
- Here the CloudFlare scans all existing domain records, it will take some time to scan completely. After completion of the scan, you’ll be directed to another your DNS Zone file. Here you can see the orange color cloud icon, it represents the service on/off indication. The best part is you can individually choose the particular sub-domain on/off on CloudFlare network.
CloudFlare offers four plans
CloudFlare Free
It is the basic & free service from the CloudFlare. It promises features like
- Fast site performance
- Broad security protection
- Powerful stats about your visitors
CloudFlare Pro
- Faster site performance
- Mobile optimizations
- Web application firewall (WAF)
- SSL
- Virtually real-time statistics
- Insight into what’s happening on your site
Price: $20/m for first website & $5/m for each subsequent website.
CloudFlare Business
- All-Pro features, plus full customization
- Advanced denial of service attack mitigation
- Railgun web optimization
- 100% uptime guarantee
Price: $200/m for each website.
CloudFlare Enterprise
- All Business features, plus setup consultation
- Dedicated account manager
- 24/7 phone support
- 2500% service level agreement (SLA)
Price: Based on quote Averages $5000/m
Conclusion
Recently I installed CloudFlare CDN network for my site. My site is running on GoDaddy hosting plan, it regularly shows 500 internal server error. After using CloudFlare I noticed a big change in site loading speeds and less number of 500 internal server errors. In my case it is very useful to speed up loading times, personally, I suggest CloudFlare for our loyal audience. If you are an existing user or a new CloudFlare CDN user share your personal experience in the below comment box.
Leave a Reply