

How to Change the Margins in Google Docs
Google Docs is a great word processor from the house of Google. It hs plenty of collaboration features, add-ons support, and many more. Margins are important in document formatting because they allow you to regulate the space between the content and the page’s edges. Adjusting margins is vital while working on a school project, a…

How to Change the Margins in Google Docs
Google Docs is a great word processor from the house of Google. It hs plenty of collaboration features, add-ons support, and many more. Margins are important in document formatting because they allow you to regulate the space between the content and the page’s edges. Adjusting margins is vital while working on a school project, a professional report, or any other document to obtain the desired layout and presentation.
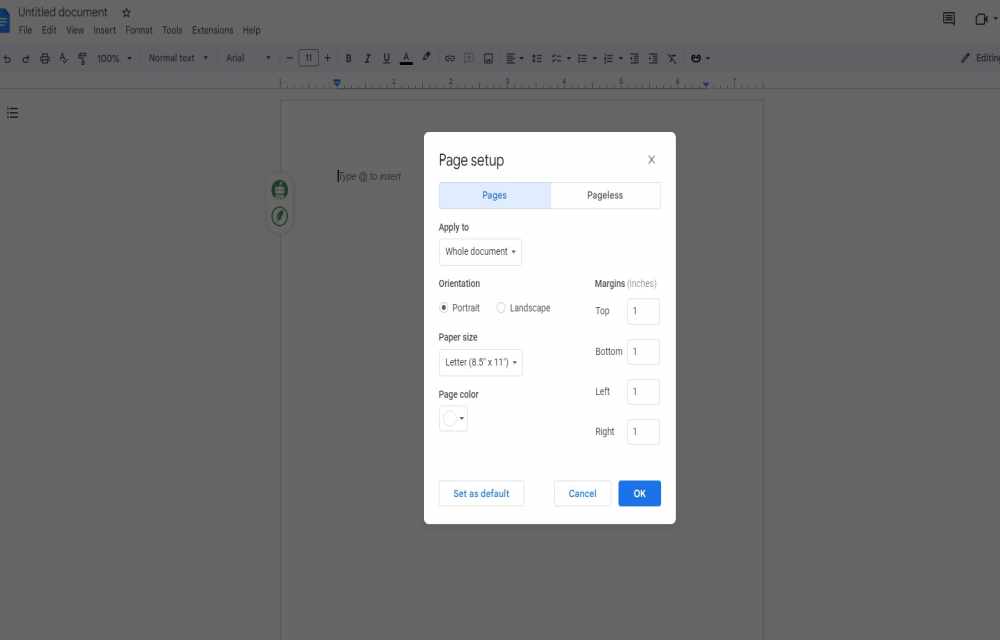
Margins in Google Docs refer to the blank spaces surrounding your document on all sides. By default, Google Docs set the margin to one inch. Here’s a simple guide on how to modify the margin orientation and ensure that all your documents follow the same margin pattern.
Changing Left and Right Margins in Google Docs
- Open your Google Docs document.
- Click on “File” in the top-left corner of the screen.
- From the drop-down menu, select “Page Setup.”
- In the “Page Setup” dialog box, you’ll find the “Margins” section.
- Under the “Margins” section, you’ll see options to adjust the left and right margins.
- By default, the margins are set to one inch on all sides. To change the left and right margins, simply click on the arrows or type in the desired value in inches.
- As you make changes, you’ll see a live preview of how the margins will look on the page.
- Once you’re satisfied with the adjustments, click on the “OK” button to apply the changes.
Changing Top and Bottom Margins in Google Docs
- Open your Google Docs document.
- Click on “File” in the top-left corner of the screen.
- From the drop-down menu, select “Page Setup.”
- In the “Page Setup” dialog box, you’ll find the “Margins” section.
- Under the “Margins” section, you’ll see options to adjust the top and bottom margins.
- By default, the margins are set to one inch. To change the top and bottom margins, click on the arrows or type in the desired value in inches.
- As you make changes, you’ll see a live preview of how the margins will look on the page.
- Once you’re satisfied with the adjustments, click on the “OK” button to apply the changes.
Conclusion
By using the above steps you can easily change the margins in the Google Docs. Whether you’re working on research papers, reports, or any other type of document, knowing this feature lets you create well-organized and visually appealing content in Google Docs.
More in How-to

How to print Web Pages in Google Chrome
Google Chrome has the ability to take a print of the websites you visit. In the Windows OS, the Google Chrome works with the print spooler service which lets you print the web pages. It is a very simple process and no brainer. If you are looking for a way to print web pages in…

How to Convert Word to Google Doc
Editing documents is a job millions of people across the world do every day, often in collaboration with others. And with more and more people using Google services such as Google Docs, document editing is gradually shifting from the traditional desktop app, Microsoft Word, to online tools like Google Docs. Check this out: How to…

How To Save My Documents In Cloud Directly
What would you do when situations like hard drive failure and corrupt OS problems occur. No doubt we completely loose our saved important files on Desktop and My Documents. Whether it is a work file and marriage or vacation picture losing data gives a lot of pain. Recently I faced this kind of situation when…
The week in tech, minus the noise.
New reviews, fixes and the stories that matter — once a week, straight to your inbox.
We only use your email to send the newsletter. Unsubscribe any time. See our privacy policy.
Comments