

How to auto delete files in Downloads folder in Windows 10
As we all use computers in today’s life. It is obvious that we download lots of files on our systems. Since all the downloads are stored in the same folder, it can fill up a lot of space and make your computer slower. With time, the downloads number increases and all the files pile up…

How to auto delete files in Downloads folder in Windows 10
As we all use computers in today’s life. It is obvious that we download lots of files on our systems. Since all the downloads are stored in the same folder, it can fill up a lot of space and make your computer slower. With time, the downloads number increases and all the files pile up at the same place.
This can be annoying to find the important files sometimes. Because the downloads folder has lots of files that are of no use. So, it becomes necessary to clean up the folder and arrange thing in a well manageable manner.
Generally, we transfer the files to a different folder to clean up things in the downloads folder. But, what if Windows itself do it for you? Yes, that is possible as well as amazing at the same time. Windows has an inbuilt feature which Microsoft calls storage sense. But how Storage sense works?
Basically, Windows allows you to choose an option in which the downloads folder automatically cleans files after 30 days. This is a handy feature as it cleans up the storage space as well as manages the files accordingly.
In this article, you will learn how you can auto-delete files in the Downloads folder.
How to auto delete Files in the Downloads folder in Windows 10:
In order to opt for the auto-deletion service, please follow the steps given below properly.
- In the Windows 10 taskbar, search for ‘Settings’.
- Now open ‘Settings’.
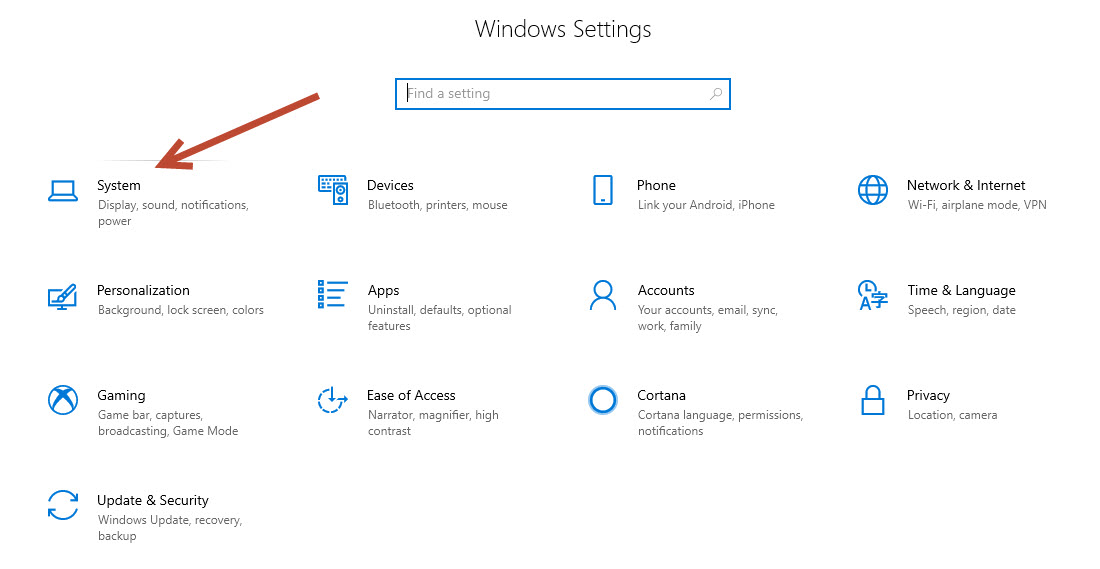
- Inside the Settings window, look for ‘System’, and click on it.
- In the next window, look out for ‘Storage’ in the left-hand side menu, and open it.
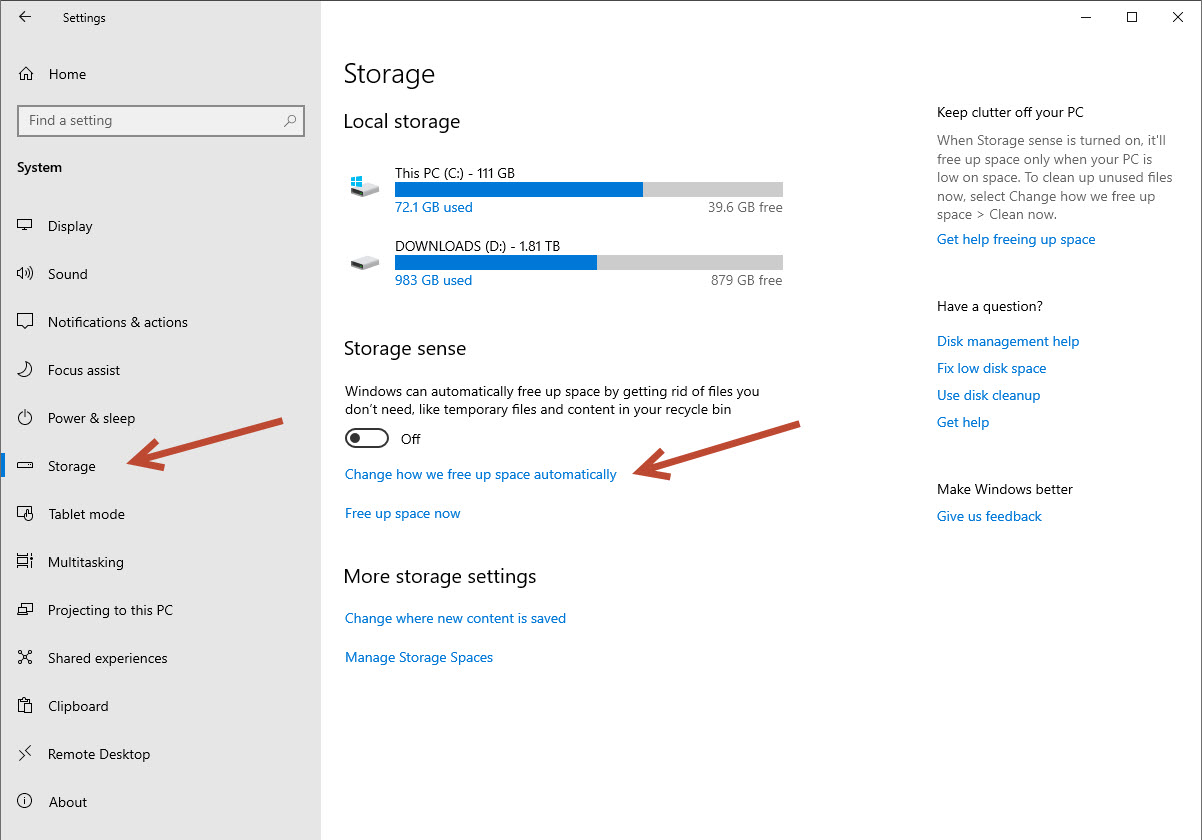
- There you’ll see, in blue color, “Change how we free up space automatically”.
- You will find a field with name “Temporary Files”.
- Under that section, check the option which says, “Delete files in the Downloads folder that haven’t changed in 30 days”.
That’s it. Since you have gone through the process, Windows will now auto-delete the files in the Downloads folder that have not changed in 30 days. This is a very handy feature as it saves a lot of time and space on your computer’s hard disk.
We hope that you have found this article useful. If you liked reading the article, please share it with your friends and family. Also, share it on social media as well. In case you have any queries, feel free to ask us in the comments section below.
More in How-to

How To Stop Microsoft Edge Opening Automatically In Windows 10
Are you looking to stop Microsoft Edge opening automatically In Windows 10? After installing a fresh copy of Windows 10 or after opening a brand new laptop or desktop the first thing you experience is Microsoft Edge as the default browser. Microsoft introduced Edge browser as a replacement of the Internet Explorer. When you start…

Locate iTunes Library File, Change Backup Location & Delete iTunes Duplicates in Windows 10
iTunes usually gets installed in the C drive, unless the user chooses otherwise. However, there are some disadvantages of installing iTunes in the default installation location as the backup itself is stored in the same location. A Windows corruption can cause irreversible damage and loss of iTunes data in this case. So it is wise…
What is $WINDOWS.~BT Folder On your PC Hard Drive
Windows installation directory (Most probably C:/) will be filled up by the new program installation or desktop files in you PC. Once you have found that, it consuming some storage without any installations or files, It might look suspicious. You have cleared the Temp folder and cleaned junk files, but nothing pays. This might be due to…
The week in tech, minus the noise.
New reviews, fixes and the stories that matter — once a week, straight to your inbox.
We only use your email to send the newsletter. Unsubscribe any time. See our privacy policy.
Comments